Smiling Face Crispy Bread Chips
Turn simple white bread into golden, crunchy smiling-face chips with just a few pantry staples. A fun, crispy snack that's ready in minutes and perfect for dipping.
Published 9 min read
- Total time
- Prep
- Cook
- Rest
- Serves
- 4
- Cuisine
- American
- Calories
- 180
- per serving, estimated

On this page15 sections
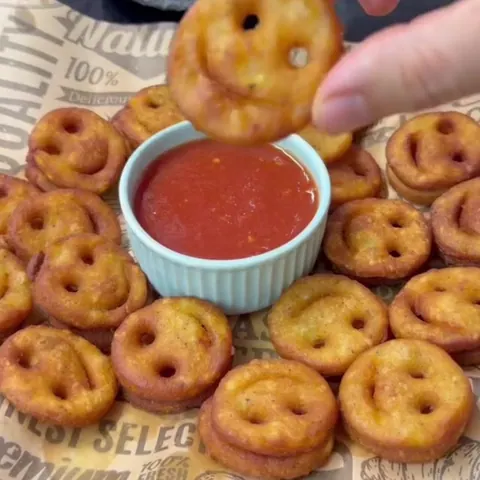
These crispy smiling-face bread chips are the ultimate fun snack: soft white bread cubes soaked in warm milk, seasoned with paprika, and fried until golden and crunchy. Each bite delivers a satisfying crackle, and the cheerful face makes them irresistible to kids and adults alike. Perfect for parties, movie nights, or just a playful afternoon treat, they come together in under 30 minutes with simple pantry staples.
Turn everyday white bread into a whimsical, crunchy snack with this easy recipe. The bread cubes are soaked in warm milk, then bound with cornstarch and seasoned with salt and sweet paprika. After a quick fry, they puff up into golden chips with a delightful crackle. The smiling face cut into each piece adds a playful touch that makes them perfect for dipping or snacking straight from the bowl.
The appeal
Why you’ll love it
Soaking the bread in warm milk softens the crumb while the cornstarch creates a light, crispy coating when fried. The milk adds moisture without making the bread soggy, and the cornstarch helps the exterior turn golden and crunchy. The result is a chip that is tender on the inside but shatteringly crisp on the outside.
The addition of sweet paprika gives the chips a warm, earthy flavor and a beautiful amber color. The salt balances the sweetness of the bread and enhances the overall taste. Frying at the right temperature ensures the chips cook quickly, puff up, and develop that irresistible crackle without absorbing excess oil.
What you need
Ingredients
Makes 4 servings.
Contains:
- Gluten
- Milk
Tools
Equipment
- Wooden cutting board
- Sharp knife
- Mixing bowl
- Plastic drinking straw
- Spoon
- Spider strainer
- Deep skillet or pot
- Paper towels
Swaps
Substitutions
Instead ofSoft white bread
UseBrioche or challah can be used for a richer flavor, but the texture may be slightly softer.
Instead ofSweet paprika
UseSmoked paprika adds a deeper, smokier flavor; use half the amount for a similar color.
Instead ofWarm milk
UseFor a dairy-free version, use unsweetened almond milk or oat milk; the chips will still crisp well.
Instead ofCornstarch
UsePotato starch or tapioca starch can replace cornstarch in equal amounts.
Good to know
Notes
Use soft, fresh white bread for the best texture; it should be pillowy but not too dense. Avoid bread with too many seeds or whole grains, as they can interfere with the smooth surface needed for the face. The bread should be sliced thinly and have a fine crumb for even soaking.
The oil should be neutral with a high smoke point, such as vegetable, canola, or sunflower oil. A deep skillet or pot works well, and a spider strainer is ideal for lifting the chips out. If you don't have a straw, a small round cookie cutter or piping tip can be used to make the eyes.
Prep
Before you start
Before starting, gather all ingredients and equipment. Slice the bread if not already sliced. Warm the milk in a small saucepan or microwave until it is warm to the touch but not boiling. Set up a frying station with oil in a deep skillet or pot and a thermometer. Have paper towels ready for draining. The entire process moves quickly once the oil is hot, so have the shaped discs ready to fry.
Step by step
Method
Phase 1
Soak and Season
Step 1: Prep the Bread
Stack the 8 slices of soft white bread on a wooden board. Using a sharp knife, slice off the crusts from all sides. Then cut the bread into small, bite-sized cubes, about 1/2 inch each. Place the cubes in a mixing bowl.
You’ll need: soft white bread
Look for: The bread cubes should be uniform in size so they soak evenly.
Tip: For easier cutting, use slightly stale bread; it holds its shape better.
Step 2: Soak the Bread
Pour 1 cup of warm milk over the bread cubes. Gently stir to coat all the pieces. Let the bread soak for 3 minutes, until the milk is absorbed and the bread is soft but not mushy.
You’ll need: warm milk
Look for: The bread should be uniformly moistened but still hold its shape when pressed.
Tip: If the bread seems too dry, add a splash more milk; if too wet, add a little more bread.
Step 3: Season the Mixture
Sprinkle 3 tablespoons of cornstarch, 1 teaspoon of salt, and 1 teaspoon of sweet paprika over the soaked bread cubes. Stir everything together until the cornstarch and seasonings are evenly distributed and the bread cubes are coated in a thick, sticky batter.
You’ll need: cornstarch · salt · sweet paprika
Look for: The mixture should be thick enough to hold together when pressed.
Tip: Mix gently to avoid breaking the bread cubes into mush.
Checkpoint
At the end of this phase, the bread cubes should be soft and fully absorbed the milk, but still hold their shape. The cornstarch and seasonings should be evenly distributed, creating a thick, sticky batter. The mixture should be cohesive enough to shape into discs without falling apart.
Phase 2
Shape and Fry
Step 4: Shape the Faces
Take a small handful of the bread mixture and press it into a flat disc about 1/2 inch thick. Use a plastic drinking straw to punch two holes for the eyes. Then, use the edge of a spoon to press a curved smile into the disc. Repeat with the remaining mixture.
You’ll need: soft white bread
Look for: The discs should be firm enough to hold their shape when lifted.
Tip: Wet your hands slightly to prevent sticking.
Step 5: Heat the Oil
Pour oil into a deep skillet or pot to a depth of about 2 inches. Heat the oil over medium-high heat until it reaches 350°F (175°C). Use a kitchen thermometer to check the temperature.
You’ll need: oil for frying
Look for: A small piece of bread dropped in should sizzle and float to the surface.
Tip: Maintain the temperature between 350°F and 375°F for even frying.
Step 6: Fry the Chips
Carefully lower a few shaped discs into the hot oil. Fry for 2 to 3 minutes, turning once, until golden brown and puffed. The chips should be crispy and sound crackly when lifted. Remove with a spider strainer and drain on paper towels.
You’ll need: oil for frying
Look for: The chips will puff up and turn deep golden brown.
Tip: Do not overcrowd the pan; fry in batches for best results.
Checkpoint
The shaped discs should have distinct eyes and a smile, and they should hold together when lifted. The oil should be at a steady 350°F (175°C). As the chips fry, they will puff up and turn golden brown with a crackling sound. Remove them when they are deeply golden and crispy.
Phase 3
Drain and Serve
Step 7: Drain and Serve
Transfer the fried chips to a plate lined with paper towels to drain any excess oil. Let them cool for a minute or two. Serve warm as a snack or appetizer, with your favorite dip if desired.
You’ll need: oil for frying
Look for: The chips should be crisp and crunchy, with a golden exterior.
Tip: For extra crunch, sprinkle with a little more salt while still warm.
Checkpoint
The chips should be drained on paper towels to remove excess oil. They should be crisp and crunchy, with a golden exterior and a tender interior. Serve them warm for the best texture, with a dip if desired.
Doneness
How to tell it’s done
The chips are done when they are deep golden brown, puffed, and crispy. To test, lift one with a spider strainer and listen for a crackling sound. The exterior should be firm and crunchy, and the interior should be tender but cooked through. If the chips are pale, fry for another minute; if they brown too quickly, lower the heat slightly.
Avoid these
Common mistakes
A common mistake is using bread that is too fresh, which can make the mixture too wet. If the batter is too sticky, add a little more cornstarch. Another issue is frying at too low a temperature, which makes the chips greasy; always check the oil with a thermometer. Overcrowding the pan can also lower the oil temperature, so fry in small batches and keep the oil hot between batches.
Better results
Tips
Tip 1
For the crispiest chips, make sure the oil is at the right temperature before frying. If the oil is too hot, the outside will brown before the inside cooks; if it's too cool, the chips will absorb oil and become greasy. Use a thermometer for accuracy and adjust the heat as needed.
Tip 2
The chips are best enjoyed fresh, but they can be kept in an airtight container for a day. To re-crisp, place them in a 350°F (175°C) oven for a few minutes. If making ahead, store the shaped discs in the refrigerator between layers of parchment paper and fry just before serving.
Make it yours
Variations
Cheesy Smiles
Add 1/4 cup of finely grated cheddar cheese to the bread mixture before shaping. The cheese melts and creates a savory, golden crust. Adjust the salt accordingly, as cheese adds saltiness.
Spicy Smiles
Replace the sweet paprika with 1/2 teaspoon of cayenne pepper and 1/2 teaspoon of smoked paprika for a spicy kick. Serve with a cooling yogurt dip to balance the heat.
Herb Smiles
Mix in 1 tablespoon of finely chopped fresh herbs, such as parsley, chives, or dill, with the seasonings. The herbs add freshness and a vibrant green fleck to the chips.
Sweet Smiles
Omit the salt and paprika, and add 2 tablespoons of sugar and 1/2 teaspoon of cinnamon to the milk mixture. After frying, dust the chips with powdered sugar for a sweet treat.
On the table
Serving suggestions
Serve the smiling-face chips warm as a playful appetizer or snack. They are perfect for dipping in ketchup, ranch dressing, or a creamy garlic dip. For a party, arrange them on a platter with a bowl of dip in the center. The faces are sure to bring smiles to guests of all ages.
These chips also make a fun addition to a kids' lunchbox or an after-school snack. Pair them with a side of fruit or a simple salad for a balanced treat. They are best enjoyed within an hour of frying, when they are at their crispiest.
Leftovers
Storage & make-ahead
- Fridge
- Store shaped discs in the refrigerator for up to 4 hours before frying. Keep them covered to prevent drying out.
- Freezer
- Freeze shaped discs on a baking sheet until solid, then transfer to a freezer bag for up to 1 month. Fry from frozen, adding 1-2 minutes to the cooking time.
- Reheat
- Reheat leftover chips in a 350°F (175°C) oven for 3-5 minutes to restore crispness. Avoid microwaving, which makes them soggy.
Store leftover chips in an airtight container at room temperature for up to 2 days. They will lose some crispness over time. To restore crunch, reheat in a 350°F (175°C) oven for 3 to 5 minutes. Avoid refrigerating, as moisture can make them soggy.
Make ahead
The shaped bread discs can be prepared up to 4 hours ahead. Place them on a baking sheet lined with parchment paper, cover with plastic wrap, and refrigerate. Fry them just before serving to ensure maximum crispness. The soaked bread mixture can also be made ahead and kept in the fridge for up to 2 hours, but it may become softer.
Questions
Frequently asked questions
Can these chips be made without deep frying?
Yes, they can be baked in an oven or air fryer. For baking, place the shaped discs on a parchment-lined baking sheet and bake at 400°F (200°C) for 12-15 minutes, flipping halfway, until golden and crispy. In an air fryer, cook at 375°F (190°C) for 8-10 minutes. The texture will be slightly less crispy than deep frying but still delicious.
What type of bread works best?
Soft white sandwich bread is ideal because it has a fine, even crumb and absorbs the milk well. Brioche or challah can be used for a richer flavor, but they may be slightly more tender. Avoid bread with large holes or crusts, as they can affect the shape and texture.
Can the chips be made gluten-free?
Yes, use gluten-free white bread and ensure the cornstarch is certified gluten-free. The rest of the ingredients are naturally gluten-free. The texture may be a bit more delicate, so handle the discs gently. Always check labels for cross-contamination.
Why are your chips not crispy?
Chips may not be crispy if the oil temperature is too low, causing them to absorb oil. Use a thermometer and maintain 350°F (175°C). Also, avoid overcrowding the pan. After frying, drain on paper towels and serve immediately. If they soften, reheat in the oven to restore crispness.
Can the dough be made ahead and refrigerated?
Yes, the shaped discs can be made ahead and refrigerated for up to 4 hours. Place them on a baking sheet lined with parchment, cover tightly, and keep cold. Fry just before serving. The soaked bread mixture itself can also be refrigerated for up to 2 hours, but it will become softer over time.
Everything in one place: the recipe card below gathers the ingredients, steps and estimated nutrition, ready to print.
Recipe card
Smiling Face Crispy Bread Chips
Turn simple white bread into golden, crunchy smiling-face chips with just a few pantry staples. A fun, crispy snack that's ready in minutes and perfect for dipping.
- Prep
- Cook
- Rest
- Total
- Servings
- 4 servings
Ingredients
- 8 slices soft white bread
- 1 cup warm milk
- 3 tbsp cornstarch
- 1 tsp salt
- 1 tsp sweet paprika
- Oil for frying, to taste
Instructions
Prep the Bread. Stack the 8 slices of soft white bread on a wooden board. Using a sharp knife, slice off the crusts from all sides. Then cut the bread into small, bite-sized cubes, about 1/2 inch each. Place the cubes in a mixing bowl.
Soak the Bread. Pour 1 cup of warm milk over the bread cubes. Gently stir to coat all the pieces. Let the bread soak for 3 minutes, until the milk is absorbed and the bread is soft but not mushy.
Season the Mixture. Sprinkle 3 tablespoons of cornstarch, 1 teaspoon of salt, and 1 teaspoon of sweet paprika over the soaked bread cubes. Stir everything together until the cornstarch and seasonings are evenly distributed and the bread cubes are coated in a thick, sticky batter.
Shape the Faces. Take a small handful of the bread mixture and press it into a flat disc about 1/2 inch thick. Use a plastic drinking straw to punch two holes for the eyes. Then, use the edge of a spoon to press a curved smile into the disc. Repeat with the remaining mixture.
Heat the Oil. Pour oil into a deep skillet or pot to a depth of about 2 inches. Heat the oil over medium-high heat until it reaches 350°F (175°C). Use a kitchen thermometer to check the temperature.
Fry the Chips. Carefully lower a few shaped discs into the hot oil. Fry for 2 to 3 minutes, turning once, until golden brown and puffed. The chips should be crispy and sound crackly when lifted. Remove with a spider strainer and drain on paper towels.
Drain and Serve. Transfer the fried chips to a plate lined with paper towels to drain any excess oil. Let them cool for a minute or two. Serve warm as a snack or appetizer, with your favorite dip if desired.
Allergens: Gluten, Milk
Nutrition (estimated, per serving)
- Calories
- 180 kcal
- Protein
- 4 g
- Carbs
- 20 g
- Fat
- 9 g
Estimates only: values vary with brands, substitutions and portion sizes.
Recipe by WixForum Kitchen · wixforum.com
Share this recipe
Send it to someone who’d love it, or save it for later.
Spotted a mistake in this recipe? Let us know.
Keep cooking


