Brown Butter Chocolate Chip Cookies with Flaky Sea Salt
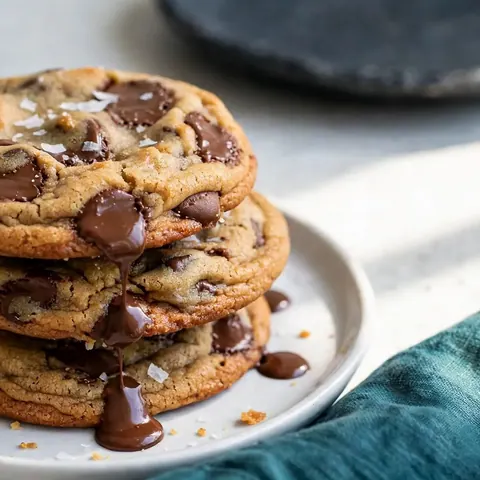
Nutty browned butter, chopped dark chocolate pools, and flaky sea salt create the ultimate chewy chocolate chip cookies with crisp golden edges.
Published 11 min read
- Total time
- Prep
- Cook
- Rest
- Serves
- 12
- Makes 12 large cookies
- Cuisine
- American
- Calories
- 260
- per serving, estimated

On this page16 sections
Browning butter is one of the simplest baking upgrades you can make in the kitchen, completely transforming standard chocolate chip cookies into an extraordinary dessert. Cooking the butter until the milk solids toast releases deep aromas of hazelnut and toffee. Combined with pools of chopped bittersweet dark chocolate and a delicate sprinkle of flaky sea salt, these cookies deliver crisp, golden edges, chewy centers, and unmatched bakery-level depth without requiring complex techniques.
Every home baker deserves a foolproof chocolate chip cookie formula that consistently delivers exceptional texture and flavor. This method relies on browning unsalted butter to evaporate excess moisture and caramelize dairy proteins, providing intense butterscotch undertones. Using chopped chocolate instead of standard chips introduces varied layers of texture, creating both melt-in-your-mouth pools and fine chocolate threads woven through the crumb. The inclusion of an extra egg yolk introduces rich moisture, preventing the baked cookie from becoming brittle or dry. When paired with brown sugar, this balance yields a dense, chewy center framed by a delicate, crispy rim. Chilling the dough solidifies the fats, controlling oven spread and allowing the flour to fully hydrate for superior browning. Finishing each cookie with crunchy sea salt balances sweetness with savory perfection.
The appeal
Why you’ll love it
Browning butter fundamentally changes the science of cookie dough by evaporating water content while toasting the milk solids through the Maillard reaction. In standard recipes, water in butter hydrates flour quickly and encourages gluten network development. By cooking out that water, you create a concentrated fat that enriches the dough with roasted, nutty aromatic compounds. Furthermore, the combination of granulated sugar and brown sugar provides dual benefits: white sugar promotes crisp outer borders and surface spreading, while the molasses in brown sugar attracts and retains ambient moisture, ensuring the core of the cookie remains tender, bendable, and chewy long after cooling.
The choice of an additional egg yolk works in synergy with the reduced water content of browned butter. Egg yolks are rich in natural lecithin and fats, acting as powerful emulsifiers that trap moisture and air when whisked alongside the sugars. This creates a glossy, stable matrix that gives the cookies their classic crinkled exterior while producing a fudgy interior bite. Hand-chopping dark chocolate creates uneven pieces ranging from thick blocks to dusty slivers. The blocks melt into wide, luxurious pools while the slivers melt into the dough itself, ensuring layered chocolate in every bite.
What you need
Ingredients
Makes 12 large cookies.
Dough
Topping
Contains:
- Milk
- Eggs
- Gluten
Served raw or lightly cooked
Soft-baked cookie centers contain eggs that may not be fully cooked. Use pasteurized eggs for pregnant women, young children, older adults, and anyone with a weakened immune system.
Tools
Equipment
- Light-colored skillet or saucepan
- Heatproof mixing bowl
- Wire whisk
- Silicone spatula
- Baking sheet
- Parchment paper
- Standard cookie scoop
Swaps
Substitutions
Instead ofDark chocolate
UseSemi-sweet chocolate chips or chopped bittersweet baking wafers
Instead ofBrown sugar
UseDark brown sugar for deeper molasses notes or muscovado sugar
Instead ofFlaky sea salt
UseFleur de sel or coarse kosher salt sprinkled sparingly
Good to know
Notes
Select high-quality unsalted butter so you have complete authority over salt levels. European-style butter, with higher butterfat, creates exceptionally nutty browned milk solids. For the chocolate, choose baking bars containing between 60 and 70 percent cacao rather than standard chocolate chips. Commercial chocolate chips often contain stabilizers like soy lecithin that force them to hold their conical shape when baked. A rough chop on a chocolate bar allows the irregular shards to melt effortlessly into wide, glossy puddles that remain soft at room temperature.
A light-colored stainless steel or enameled skillet is essential during the browning stage. Dark nonstick pans obscure the bottom of the vessel, making it nearly impossible to spot when milk solids transition from golden to burned. Always use parchment paper rather than greasing the baking pan directly; excess grease causes the dough to spread too thin before the structure sets. Finally, keep flaky sea salt on hand for the final flourish, as fine table salt would dissolve instantly and deliver an unpleasantly harsh, salty bite.
Prep
Before you start
Measure out all dry ingredients precisely using a kitchen scale or by fluffing and leveling flour with a spoon. Chop the dark chocolate bar across a cutting board into irregular chunks, reserving some larger square pieces to position on top of the scoops. Bring the whole egg and extra egg yolk to room temperature so they integrate smoothly with the cooled browned butter without causing it to seize. Line two sturdy baking sheets with parchment paper and clear enough flat shelf space in your refrigerator to chill the scooped dough balls comfortably without stacking.
Step by step
Method
Phase 1
Browning the Butter
Step 1: Melt and Foam Butter
Place the unsalted butter in a light-colored pan set over medium heat. Allow the butter to melt completely, swirling the pan occasionally as it begins to bubble and sizzle vigorously.
You’ll need: unsalted butter
Look for: A dense layer of white foam forms on top while the butter crackles steadily.
Tip: Use a stainless steel or enameled pan so you can clearly monitor color changes.
Step 2: Brown and Cool Butter
Continue heating the melted butter until the foaming subsides, nutty aromas rise, and golden brown flecks settle at the bottom. Immediately scrape the browned butter into a mixing bowl to cool slightly.
You’ll need: unsalted butter
Look for: The milk solids turn a toasted hazelnut shade and smell deeply aromatic.
Tip: Transfer out of the warm pan immediately so the delicate milk solids do not burn.
Checkpoint
The butter transitions from yellow liquid to active foam, quiet sizzles, and finally a warm amber broth dotted with dark golden flecks. You will notice a rich, toasty hazelnut aroma filling the kitchen. The milk solids at the bottom of the pan should appear warm hazelnut-colored, never black or charred. When poured into a heatproof bowl, the liquid looks translucent with speckled sediment resting quietly beneath.
Phase 2
Mixing and Dough Formation
Step 3: Whisk Butter and Sugars
Add the brown sugar and white sugar to the cooled browned butter. Whisk vigorously for about two minutes until the sugars absorb the fat and the mixture turns thick and smooth.
You’ll need: brown sugar · white sugar
Look for: The grainy texture smooths out into a glossy, caramel-colored paste.
Tip: Ensure the butter feels barely warm to the touch so it does not scramble eggs.
Step 4: Beat in Eggs and Vanilla
Add the whole egg, extra egg yolk, and vanilla extract into the sugar mixture. Whisk continuously for another two minutes until the batter lightens slightly in color and becomes glossy and ribbons form.
You’ll need: large egg · large egg yolk · vanilla extract
Look for: The mixture turns pale satin and drips off the whisk in thick, cohesive ribbons.
Tip: Vigorous whisking emulsifies the fat and liquid, helping produce shiny, crinkly cookie tops.
Step 5: Fold in Dry Ingredients
Sprinkle the all-purpose flour, baking soda, and fine salt over the wet mixture. Use a silicone spatula to fold the dry ingredients gently just until a soft, uniform dough comes together without dry flour streaks.
You’ll need: all-purpose flour · baking soda · fine salt
Look for: All white streaks vanish into a tender, soft, cohesive dough ball.
Tip: Stop folding the second dry flour disappears to avoid activating excess gluten.
Step 6: Fold in Dark Chocolate
Add the roughly chopped dark chocolate to the bowl. Fold gently with the spatula until the chocolate chunks and shards are evenly distributed throughout the dough.
You’ll need: dark chocolate
Look for: Chocolate pieces are dispersed uniformly through every portion of dough.
Tip: Chop by hand to yield a mixture of large chunks and tiny chocolate ribbons.
Checkpoint
The butter, sugars, and eggs form an emulsified, shiny batter that ribbons smoothly off the whisk. Once the dry ingredients are folded in, the dough becomes soft, pliable, and uniform with zero pockets of dry flour visible. The chopped dark chocolate distributes evenly throughout the mixture, with small chocolate dustings tinting the dough slightly tan while sturdy chunks protrude throughout.
Phase 3
Portioning, Baking, and Finishing
Step 7: Portion and Chill Dough
Scoop generous mounds of dough onto a tray using a cookie scoop. Transfer the scooped portions to the refrigerator to chill for at least thirty minutes until completely firm to the touch.
Look for: The dough mounds feel solid, cold, and hold their rounded shape firmly.
Tip: Chilling prevents excessive spreading and concentrates the rich toffee flavors.
Step 8: Bake the Cookies
Arrange the chilled dough balls spaced two inches apart on a parchment-lined baking sheet. Bake in an oven preheated to 350°F (175°C) for 10 to 12 minutes until set, or cook to 160°F (71°C) to cook eggs through.
Internal temperature 160°F (71°C)
Look for: The edges look golden and firm while the cookie centers remain pale and soft.
Tip: Leave plenty of space between cookies so they spread cleanly without merging.
Step 9: Garnish with Salt and Rest
Remove the baking sheet from the oven and immediately sprinkle the warm cookies with flaky sea salt. Allow the cookies to settle on the warm pan for five minutes before transferring them to cool.
You’ll need: flaky sea salt
Look for: Flaky crystals adhere securely across the molten, glistening pools of dark chocolate.
Tip: Sprinkle the salt while the chocolate pools remain hot so the flakes stick.
Checkpoint
Chilled dough portions should feel firm, cold, and solid to the touch. Once baked, the outer ring is golden-brown and slightly raised, while the centers look soft, textured, and gently puffed. Melted pools of dark chocolate should glisten across the surface, holding the delicate flakes of sea salt securely in place without melting the salt crystals away entirely.
Doneness
How to tell it’s done
Cookies are properly baked when the perimeter turns set and takes on a rich golden-brown hue while the center remains slightly puffy, pale, and tender. Because the soft, gooey centers are not baked fully firm, they retain a custardy chew. To cook the eggs completely through for standard food safety, bake until the centers reach an internal temperature of 160°F (71°C). Residual heat on the baking sheet will set the crumb slightly during cooling, so pulling them out while the center is delicate ensures optimal chewiness without drying out.
Avoid these
Common mistakes
The most frequent error is burning the browned butter by keeping it on the flame too long or leaving it in a hot skillet after taking it off the stove. Residual heat will quickly turn golden milk solids into black, bitter specks. Another common misstep is failing to chill the dough before baking. Warm butter spreads immediately on hot metal pans, yielding flat, greasy disks rather than thick, chewy centers. Lastly, avoid overworking the flour into the wet ingredients; fold only until the dry flour streaks disappear to keep the gluten tender.
Cook safely
Food safety
Safe internal temperatures
Cook to at least these temperatures, measured with an instant-read thermometer in the thickest part.
| Food | Minimum internal temperature |
|---|---|
| Egg dishes | 160°F (71°C) |
Raw or lightly cooked ingredients
Soft-baked cookie centers contain eggs that may not be fully cooked. Use pasteurized eggs for pregnant women, young children, older adults, and anyone with a weakened immune system.
Better results
Tips
Tip 1
For photogenic, picture-perfect bakery puddles, press a few reserved large chunks of chopped dark chocolate directly onto the tops of the raw dough mounds right before they head into the oven. As the dough expands and settles, these top chunks melt flat into broad, glossy chocolate pools. If a cookie spreads into an irregular oval shape while baking, immediately swirl a round cookie cutter or heatproof bowl gently around the hot cookie edges as soon as it exits the oven to nudge it into a flawless circle.
Tip 2
Do not skip the chilling stage under any circumstances. Chilling allows the flour to hydrate completely and solidifies the butterfat, which dramatically slows the rate of spread during the initial minutes of baking. If you have extra time, letting the portioned dough rest in the refrigerator overnight yields even deeper butterscotch and toffee complexity as the starches break down into simple sugars. Always bake on the middle oven rack to ensure balanced heat distribution and prevent premature scorching along the bottom.
Make it yours
Variations
Toasted Pecan Chocolate Chunk
Fold one-half cup of finely chopped toasted pecans into the dough alongside the dark chocolate. The nutty pecans complement the natural hazelnut aromas of the browned butter, adding a delightful crisp texture to every single bite.
Triple Chocolate Espresso
Add one teaspoon of instant espresso powder to the warm browned butter before mixing, and combine dark, milk, and white chocolate chunks. The coffee notes sharpen the chocolate flavors and balance the sweetness across the crumb.
Orange Zest Dark Chocolate
Rub the freshly grated zest of one medium orange directly into the granulated and brown sugars before whisking. The bright citrus oils infuse throughout the dough, providing an aromatic brightness that cuts through rich dark chocolate.
Spiced Cinnamon Brown Butter
Whisk one-half teaspoon of ground cinnamon and a pinch of ground nutmeg into the flour mixture before folding. These warming spices enhance the caramelized molasses notes of the brown sugar, creating an autumnal bakery profile.
On the table
Serving suggestions
Serve these cookies slightly warm while the chocolate chunks remain delightfully molten and gooey. A tall glass of cold whole milk or oat milk provides the classic cooling contrast to the rich, warm butterscotch crumb. For a more sophisticated dessert course, plate a warm cookie alongside a scoop of vanilla bean, espresso, or salted caramel ice cream, allowing the melting cream to mingle with the pool of warm dark chocolate and crunchy sea salt.
These cookies also shine as an afternoon treat alongside a hot espresso, dark roast coffee, or rich black tea. The natural acidity and roasted notes in coffee cut through the sweetness of the browned butter, enhancing the nutty notes of the caramelized milk solids. When serving a crowd, arrange them on a clean wooden board with a small bowl of extra flaky salt for guests who appreciate an extra savory crunch.
Leftovers
Storage & make-ahead
- Fridge
- Store unbaked dough balls covered in the refrigerator for up to 72 hours before baking.
- Freezer
- Freeze portioned dough balls in an airtight freezer container or zip-top bag for up to 3 months.
- Reheat
- Warm individual cookies in an oven preheated to 300°F (150°C) for 3 to 4 minutes until gooey.
Store cooled cookies in an airtight container at room temperature for up to five days with a slice of plain white bread tucked inside. The cookies absorb moisture from the bread, maintaining their chewy, soft interior without altering flavor. Keep the container out of direct sunlight and away from hot kitchen appliances to prevent the chocolate pools from melting and smearing. Never refrigerate baked cookies, as the cold environment accelerates starch retrogradation and turns them crumbly.
Make ahead
Portion the freshly mixed dough into balls and arrange them on a parchment-lined tray to freeze until rock-hard, about two hours. Transfer the frozen dough portions into a zip-top freezer bag and store for up to three months. When ready to enjoy fresh cookies, place frozen dough mounds directly onto a lined baking sheet and bake at 350°F (175°C), adding one to two extra minutes to the total bake time without needing to thaw.
Questions
Frequently asked questions
Why is unsalted butter preferred over salted butter for browning?
Unsalted butter allows exact control over the salt balance in the dough. Additionally, salted butter foams much more vigorously during the browning process, making it difficult to monitor the color of the milk solids at the base of the skillet and increasing the risk of burning.
Can the cookie dough be baked immediately without chilling?
Baking without chilling leads to excessive spreading, thin brittle edges, and greasy textures because the browned butter remains warm and liquid. Chilling solidifies the butterfat, controls oven spread, and allows the flour to hydrate fully, resulting in a significantly thicker, chewier cookie.
Why use chopped chocolate bars instead of pre-packaged chocolate chips?
Commercial chocolate chips contain stabilizing agents and less cocoa butter to help them retain their shape when heated. Chopping a baking chocolate bar creates irregular shards that melt smoothly, forming wide, decadent pools and thin chocolate ripples laced throughout the cookie crumb.
How can cookies be kept soft and chewy for several days?
Store cooled cookies inside an airtight container with a single slice of sandwich bread. The cookies naturally draw moisture from the bread, preserving their tender crumb. Keep the container sealed at room temperature, and avoid storing baked cookies in the refrigerator.
What causes browned butter to burn rather than toast nicely?
Browned butter burns when left over high heat or neglected in a hot pan after cooking. Milk solids toast in mere seconds once moisture evaporates. Use medium heat, swirl continuously, and transfer the butter to a heatproof bowl immediately once hazelnut specks appear.
Everything in one place: the recipe card below gathers the ingredients, steps and estimated nutrition, ready to print.
Recipe card
Brown Butter Chocolate Chip Cookies with Flaky Sea Salt
Nutty browned butter, chopped dark chocolate pools, and flaky sea salt create the ultimate chewy chocolate chip cookies with crisp golden edges.
- Prep
- Cook
- Rest
- Total
- Servings
- 12 large cookies
Ingredients
Dough
- 1/2 cup unsalted butter
- 1/2 cup brown sugar, packed
- 1/4 cup white sugar
- 1 large egg, room temperature
- 1 large egg yolk, room temperature
- 1 tsp vanilla extract
- 1 1/4 cups all-purpose flour
- 1/2 tsp baking soda
- 1/2 tsp fine salt
- 6 oz dark chocolate, roughly chopped
Topping
- 1/2 tsp flaky sea salt
Instructions
Melt and Foam Butter. Place the unsalted butter in a light-colored pan set over medium heat. Allow the butter to melt completely, swirling the pan occasionally as it begins to bubble and sizzle vigorously.
Brown and Cool Butter. Continue heating the melted butter until the foaming subsides, nutty aromas rise, and golden brown flecks settle at the bottom. Immediately scrape the browned butter into a mixing bowl to cool slightly.
Whisk Butter and Sugars. Add the brown sugar and white sugar to the cooled browned butter. Whisk vigorously for about two minutes until the sugars absorb the fat and the mixture turns thick and smooth.
Beat in Eggs and Vanilla. Add the whole egg, extra egg yolk, and vanilla extract into the sugar mixture. Whisk continuously for another two minutes until the batter lightens slightly in color and becomes glossy and ribbons form.
Fold in Dry Ingredients. Sprinkle the all-purpose flour, baking soda, and fine salt over the wet mixture. Use a silicone spatula to fold the dry ingredients gently just until a soft, uniform dough comes together without dry flour streaks.
Fold in Dark Chocolate. Add the roughly chopped dark chocolate to the bowl. Fold gently with the spatula until the chocolate chunks and shards are evenly distributed throughout the dough.
Portion and Chill Dough. Scoop generous mounds of dough onto a tray using a cookie scoop. Transfer the scooped portions to the refrigerator to chill for at least thirty minutes until completely firm to the touch.
Bake the Cookies. Arrange the chilled dough balls spaced two inches apart on a parchment-lined baking sheet. Bake in an oven preheated to 350°F (175°C) for 10 to 12 minutes until set, or cook to 160°F (71°C) to cook eggs through.
Garnish with Salt and Rest. Remove the baking sheet from the oven and immediately sprinkle the warm cookies with flaky sea salt. Allow the cookies to settle on the warm pan for five minutes before transferring them to cool.
Allergens: Milk, Eggs, Gluten
Nutrition (estimated, per serving)
- Calories
- 260 kcal
- Protein
- 3.2 g
- Carbs
- 32.5 g
- Fat
- 13.8 g
- Fiber
- 1.6 g
- Sugar
- 20.4 g
- Sodium
- 185 mg
Estimates only: values vary with brands, substitutions and portion sizes.
Recipe by WixForum Kitchen · wixforum.com
Share this recipe
Send it to someone who’d love it, or save it for later.
Spotted a mistake in this recipe? Let us know.
Keep cooking


