Cheesy Chicken Pastry Pot with Braided Lid
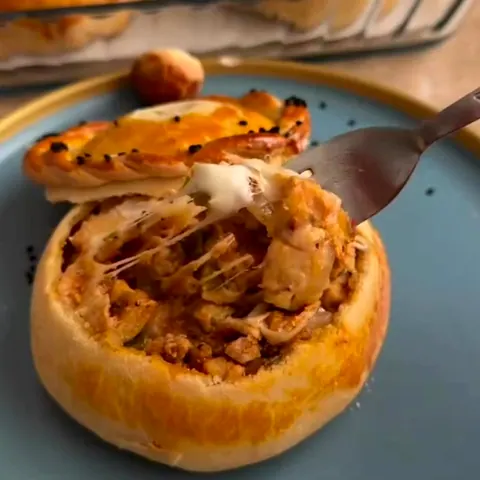
A showstopping dinner: soft yeast dough draped into a glass cup, filled with spiced chicken, peppers, onions, and melted kaşar cheese, then baked until golden. Lift the braided lid to reveal a molten, cheesy center.
Published 10 min read
- Total time
- Prep
- Cook
- Serves
- 4
- Makes 4 pastry pots
- Cuisine
- Turkish-inspired
- Calories
- 620
- per serving, estimated

On this page16 sections
Drape a circle of soft yeast dough inside a glass cup, fill it with seasoned chicken and melted cheese, then bake until the top is golden and puffed. When you lift the braided pastry lid, a cloud of steam escapes, revealing a molten, cheesy center. This dramatic dinner is surprisingly simple to assemble and feels like a special occasion — yet it comes together with everyday ingredients. The edible bowl is part of the fun: every bite includes crisp, buttery crust and a savory, gooey filling.
These individual pastry pots are a creative twist on stuffed bread, perfect for a cozy dinner or a weekend showstopper. Soft yeast dough is draped into glass cups, filled with a mixture of cooked chicken, caramelized onions, green peppers, and shredded kaşar cheese, then sealed and baked until golden. The braided lid is not just decorative — it seals in the filling and creates that dramatic steam release when you lift it. Serve them straight from the oven, with the lid lifted tableside for maximum effect. The contrast of textures — crisp crust, tender bread, and creamy cheese — makes every spoonful satisfying.
The appeal
Why you’ll love it
The method of lining a cup with dough creates a self-contained edible bowl that bakes evenly and holds the filling without leaking. Because the dough is thin, it turns crisp at the edges while staying soft inside, giving you the best of both textures. Sealing the top traps steam, which helps the dough puff and keeps the chicken moist.
Using a glass cup allows you to see the golden crust as it bakes, and it doubles as a serving vessel — no extra dishes. The braided lid is more than a pretty detail: it seals the filling and creates a built-in handle for lifting. The egg wash and nigella seeds add color and flavor, while the cheese melts into a creamy sauce that coats the chicken and vegetables.
What you need
Ingredients
Makes 4 pastry pots.
Filling
Topping
Contains:
- Gluten
- Eggs
- Milk
Tools
Equipment
- 4 glass ice-cream footed cups (or 12-oz ramekins)
- Rolling pin
- Pastry brush
- Small bowl
- Fork
- Baking sheet
Swaps
Substitutions
Instead ofKaşar cheese
UseMild provolone or low-moisture mozzarella, shredded
Instead ofCooked chicken breast
UseRotisserie chicken, shredded or cubed
Instead ofGreen peppers
UseDiced zucchini or roasted red peppers
Instead ofSoft yeast dough
UsePizza dough (thawed, if frozen)
Good to know
Notes
Soft yeast dough works best — either store-bought pizza dough or a homemade batch. If using frozen dough, thaw it overnight in the refrigerator. The dough should be pliable enough to drape without tearing; if it resists, let it rest at room temperature for 15 minutes before rolling.
Kaşar cheese is a Turkish semi-hard cheese that melts beautifully, but you can substitute mild provolone, low-moisture mozzarella, or a mix of mozzarella and cheddar. Use cooked chicken breast — rotisserie chicken is ideal. Caramelize the onions slowly to bring out their sweetness, and dice the green peppers small so they integrate evenly.
Prep
Before you start
Before starting, make sure the yeast dough is at room temperature so it rolls easily. If using store-bought dough, let it sit out for 30 minutes. Prepare the filling: cook and cube the chicken, caramelize the onions, dice the green peppers, and shred the cheese. Have four glass ice-cream footed cups or ramekins ready, along with a rolling pin, pastry brush, and a baking sheet. Preheat the oven to 375°F (190°C).
Step by step
Method
Phase 1
Assembly and Filling
Step 1: Prepare the Dough and Filling
Divide the soft yeast dough into 4 equal pieces. On a lightly floured surface, roll each piece into a thin circle about 8 inches in diameter. In a medium bowl, combine the cooked chicken breast, caramelized onions, green peppers, and shredded kaşar cheese. Mix gently until evenly distributed.
You’ll need: soft yeast dough (store-bought or homemade) · cooked chicken breast, cubed · caramelized onions · green peppers, diced · shredded kaşar cheese
Look for: The dough circles should be thin enough to drape without tearing, about 1/8 inch thick.
Tip: Keep the dough covered with a damp towel while working to prevent drying.
Step 2: Drape Dough into Cups
Drape each dough circle inside a glass ice-cream footed cup, pressing gently so the dough lines the bottom and sides, leaving a slight overhang. The dough should form a cavity that will hold the filling.
You’ll need: soft yeast dough (store-bought or homemade)
Look for: The dough should cling to the glass without slipping; the overhang will become the braided lid.
Tip: If the dough slides, chill the cups for 5 minutes to firm it up.
Step 3: Fill the Dough Cavity
Spoon the chicken and cheese mixture into each dough-lined cup, filling almost to the top. Press the filling down lightly to pack it, but leave enough room to fold the dough over the top.
You’ll need: cooked chicken breast, cubed · caramelized onions · green peppers, diced · shredded kaşar cheese
Look for: The filling should be mounded slightly but not overflowing.
Tip: Overfilling can make the lid difficult to seal; aim for 3/4 full.
Checkpoint
At the end of this phase, you should have four dough-lined cups filled with the chicken and cheese mixture. The dough should be evenly draped, with a slight overhang for sealing. The filling should be mounded but not overflowing. The cups should look neat and tidy, with no tears in the dough. If any dough has torn, patch it now.
Phase 2
Sealing and Baking
Step 4: Seal and Braid the Lid
Bring the overhanging dough edges up over the filling, pinching and twisting them together to form a sealed top. Then braid or twist the dough into a decorative lid, or simply pinch into a rustic top. Make sure the dough is sealed well so the cheese doesn't leak during baking.
You’ll need: soft yeast dough (store-bought or homemade)
Look for: The top should be tightly sealed; any gaps will let cheese escape.
Tip: For a quick braid, twist two long strips of dough together and lay over the top.
Step 5: Brush with Egg Yolk
In a small bowl, beat the egg yolk with 1 teaspoon of water. Brush the beaten egg yolk over the entire surface of the dough tops, covering all the exposed dough.
You’ll need: egg yolk, beaten
Look for: The dough will look glossy and yellow; this gives a shiny, golden finish.
Tip: Don't skip the egg wash — it's what makes the crust beautifully burnished.
Step 6: Sprinkle with Nigella Seeds
Sprinkle the black nigella seeds evenly over the egg-washed dough tops, pressing lightly so they stick.
You’ll need: black nigella seeds
Look for: The seeds will dot the surface; they add a mild onion-like flavor and visual contrast.
Tip: If you don't have nigella seeds, sesame seeds work, but the flavor will differ.
Step 7: Bake the Pastry Pots
Place the cups on a baking sheet and bake at 375°F (190°C) for 22 minutes, until the dough is puffed, shiny, and deep golden brown. The filling should be bubbling and the cheese melted.
You’ll need: soft yeast dough (store-bought or homemade) · egg yolk, beaten
Internal temperature 160°F (71°C)
Look for: The tops will be deeply browned and the cheese may bubble at the edges.
Tip: If the tops brown too quickly, tent loosely with foil for the last 5 minutes.
Checkpoint
The dough tops should be sealed tightly, with a braided or twisted design. The egg wash should be glossy, and the nigella seeds should be evenly distributed. After baking, the pots should be deeply golden, puffed, and the cheese should be bubbling at the edges. The kitchen will smell of toasted bread and melted cheese.
Phase 3
Resting and Serving
Step 8: Cool Slightly and Serve
Let the pastry pots rest for 5 minutes on the baking sheet. To serve, place each cup on a plate and use a fork to lift the braided lid, releasing a cloud of steam and revealing the molten cheese and chicken inside.
You’ll need: shredded kaşar cheese · cooked chicken breast, cubed
Look for: The lid should lift easily, showing a creamy, bubbling filling.
Tip: Serve warm, as the cheese will set as it cools.
Checkpoint
After resting, the pots should be set enough to handle but still warm. When you lift the lid with a fork, steam should escape and the cheese should be molten and creamy. The chicken should be hot, and the crust should be crisp to the touch. Serve immediately, as the cheese will begin to set as it cools.
Doneness
How to tell it’s done
The pastry pots are done when the dough is puffed, shiny, and deep golden brown all over, and the filling is bubbling at the edges. The internal temperature of the dough should reach at least 160°F (71°C) to ensure the egg wash is fully set. If you insert an instant-read thermometer into the center of the dough, it should read 160°F (71°C) or higher. The cheese should be fully melted and creamy, not stringy or raw.
Avoid these
Common mistakes
One common mistake is overfilling the dough cups, which makes the lid difficult to seal and can cause the cheese to leak out during baking. Another is rolling the dough too thick, resulting in a doughy, undercooked center. If the dough tears while draping, patch it with a small piece of extra dough. Also, do not skip the egg wash — it gives the crust its glossy, golden finish. Finally, let the pots rest for 5 minutes after baking; cutting into them immediately can cause the filling to spill out.
Cook safely
Food safety
Safe internal temperatures
Cook to at least these temperatures, measured with an instant-read thermometer in the thickest part.
| Food | Minimum internal temperature |
|---|---|
| Egg dishes | 160°F (71°C) |
Better results
Tips
Tip 1
For the best texture, use a soft, enriched dough rather than a lean pizza dough. Enriched dough contains butter or oil, which gives a tender, almost brioche-like crumb. If you only have pizza dough, add a tablespoon of olive oil to the dough while mixing to improve its richness. Also, keep the dough covered when not using it, as it dries out quickly.
Tip 2
To make the braided lid easier, roll the dough into a rectangle and cut strips, then twist them into a rope. Lay the rope over the filling and tuck the ends under. Alternatively, simply pinch the dough together into a rustic top — it will still puff and brown beautifully. The key is a tight seal so the cheese doesn't leak.
Make it yours
Variations
Vegetarian Version
Replace the chicken with 2 cups of sautéed mushrooms and spinach. Add a pinch of smoked paprika to the filling for depth. Use the same amount of cheese and bake as directed.
Spicy Kick
Add 1/2 teaspoon of red pepper flakes or a minced jalapeño to the filling. Use pepper jack cheese instead of kaşar for extra heat. The spice pairs well with the sweet caramelized onions.
Breakfast Pockets
Use scrambled eggs, cooked sausage, and cheddar cheese instead of chicken and kaşar. Omit the green peppers and add a spoonful of salsa. Bake at 375°F for 20 minutes, until golden.
Mediterranean Twist
Swap the chicken for chopped cooked lamb or beef, and use feta and mozzarella instead of kaşar. Add chopped Kalamata olives and sun-dried tomatoes to the filling. Sprinkle with oregano before baking.
On the table
Serving suggestions
Serve the pastry pots as a main course with a crisp green salad or roasted vegetables on the side. They are also wonderful as a hearty appetizer — make smaller versions in 4-ounce ramekins and serve one per guest. The dramatic lid-lifting moment makes them a conversation starter at any dinner party.
Pair them with a light, acidic side like a tomato-cucumber salad or a bowl of marinated olives. For a heartier meal, serve alongside a bowl of tomato soup or a simple lentil stew. The rich, cheesy filling calls for something fresh and bright to balance the richness.
Leftovers
Storage & make-ahead
- Fridge
- Store leftover pastry pots in an airtight container in the refrigerator for up to 3 days. Reheat in a 350°F oven for 10 minutes to restore crispness.
- Freezer
- Freeze unbaked or baked pastry pots for up to 2 months. To reheat baked pots, thaw overnight in the refrigerator and warm in a 350°F oven.
- Reheat
- Reheat in a 350°F (175°C) oven for 10 minutes, or until the internal temperature reaches 165°F (74°C). Avoid microwaving to keep the crust crisp.
Leftover pastry pots can be stored in an airtight container in the refrigerator for up to 3 days. To reheat, place them in a 350°F (175°C) oven for 10 minutes, or until warmed through and the crust is crisp again. Avoid microwaving, as it makes the dough soggy.
Make ahead
You can assemble the pastry pots up to 6 hours ahead, cover them with plastic wrap, and refrigerate. Brush with egg wash and sprinkle with nigella seeds just before baking. If baking from chilled, add 5 minutes to the baking time. The filling can also be made a day ahead and kept refrigerated.
Questions
Frequently asked questions
Can this recipe be made ahead of time?
Yes, the pastry pots can be assembled up to 6 hours ahead, covered, and refrigerated. Brush with egg wash and sprinkle with nigella seeds just before baking. If baking from chilled, add 5 minutes to the baking time. The filling can also be prepared a day in advance and kept refrigerated.
What can be used instead of kaşar cheese?
Kaşar cheese is a semi-hard Turkish cheese that melts well. Good substitutes include mild provolone, low-moisture mozzarella, or a blend of mozzarella and cheddar. Avoid aged cheeses that don't melt smoothly, like aged cheddar or Parmesan.
Can this recipe be frozen?
Yes, freeze unbaked or baked pastry pots for up to 2 months. To bake from frozen, add 10 minutes to the baking time. To reheat baked pots, thaw overnight in the refrigerator and warm in a 350°F (175°C) oven until heated through.
Why did the cheese leak out during baking?
Cheese leaks if the dough is not sealed tightly or if the cups are overfilled. Make sure to pinch the dough edges firmly together and leave a little room at the top of the cup. Also, avoid overfilling with cheese, as it expands when melted.
Can this recipe be made without eggs?
The egg wash gives the crust its shiny, golden finish, but it can be omitted. Brush the dough with milk or cream instead, or simply leave it plain. The crust will be less shiny but still delicious. If omitting eggs, ensure the dough is baked until golden brown.
Everything in one place: the recipe card below gathers the ingredients, steps and estimated nutrition, ready to print.
Recipe card
Cheesy Chicken Pastry Pot with Braided Lid
A showstopping dinner: soft yeast dough draped into a glass cup, filled with spiced chicken, peppers, onions, and melted kaşar cheese, then baked until golden. Lift the braided lid to reveal a molten, cheesy center.
- Prep
- Cook
- Total
- Servings
- 4 pastry pots
Ingredients
- 1 lb soft yeast dough (store-bought or homemade)
Filling
- 2 cups cooked chicken breast, cubed
- 1/2 cup caramelized onions
- 1/2 cup green peppers, diced
- 1 cup shredded kaşar cheese
Topping
- 1 egg yolk, beaten
- 1 tsp black nigella seeds
Instructions
Prepare the Dough and Filling. Divide the soft yeast dough into 4 equal pieces. On a lightly floured surface, roll each piece into a thin circle about 8 inches in diameter. In a medium bowl, combine the cooked chicken breast, caramelized onions, green peppers, and shredded kaşar cheese. Mix gently until evenly distributed.
Drape Dough into Cups. Drape each dough circle inside a glass ice-cream footed cup, pressing gently so the dough lines the bottom and sides, leaving a slight overhang. The dough should form a cavity that will hold the filling.
Fill the Dough Cavity. Spoon the chicken and cheese mixture into each dough-lined cup, filling almost to the top. Press the filling down lightly to pack it, but leave enough room to fold the dough over the top.
Seal and Braid the Lid. Bring the overhanging dough edges up over the filling, pinching and twisting them together to form a sealed top. Then braid or twist the dough into a decorative lid, or simply pinch into a rustic top. Make sure the dough is sealed well so the cheese doesn't leak during baking.
Brush with Egg Yolk. In a small bowl, beat the egg yolk with 1 teaspoon of water. Brush the beaten egg yolk over the entire surface of the dough tops, covering all the exposed dough.
Sprinkle with Nigella Seeds. Sprinkle the black nigella seeds evenly over the egg-washed dough tops, pressing lightly so they stick.
Bake the Pastry Pots. Place the cups on a baking sheet and bake at 375°F (190°C) for 22 minutes, until the dough is puffed, shiny, and deep golden brown. The filling should be bubbling and the cheese melted.
Cool Slightly and Serve. Let the pastry pots rest for 5 minutes on the baking sheet. To serve, place each cup on a plate and use a fork to lift the braided lid, releasing a cloud of steam and revealing the molten cheese and chicken inside.
Allergens: Gluten, Eggs, Milk
Nutrition (estimated, per serving)
- Calories
- 620 kcal
- Protein
- 32 g
- Carbs
- 58 g
- Fat
- 28 g
Estimates only: values vary with brands, substitutions and portion sizes.
Recipe by WixForum Kitchen · wixforum.com
Share this recipe
Send it to someone who’d love it, or save it for later.
Spotted a mistake in this recipe? Let us know.
Keep cooking


