Crispy Baked Garlic Parmesan Chicken Wings
Learn how to bake exceptionally crispy chicken wings tossed in rich garlic butter, grated parmesan, fresh parsley, and bright lemon juice.
Published 12 min read
- Total time
- Prep
- Cook
- Rest
- Serves
- 4
- Makes 24 wings
- Cuisine
- American
- Calories
- 540
- per serving, estimated

On this page16 sections
Achieving authentic pub-style chicken wings at home no longer requires standing over a vat of boiling cooking oil. By utilizing a simple pantry technique paired with steady dry heat, chicken skin transforms into an intensely shattered, golden crust that cradles an opulent blend of melted butter, fresh garlic, sharp grated parmesan cheese, and clean citrus. This reliable oven method provides pristine textural contrast, ensuring tender, succulent poultry meat underneath an undeniably crunchy shell.
Garlic parmesan wings hold a revered place on appetizer menus, prized for their aromatic balance of savory dairy, piquant alliums, and rich poultry. While standard commercial kitchens rely on commercial deep fryers, home kitchens frequently suffer from greasy, soggy outcomes when attempting shallow frying. The combination of aluminum-free baking powder and an elevated wire rack circumvents those issues entirely, drawing surface moisture out while accelerating non-enzymatic browning. Once roasted to a blistered perfection, the wings meet an emulsion of warm butter, freshly grated hard cheese, garden parsley, and bright lemon. Paired with a bowl of cooling ranch dip, this dish delivers unmatched satisfaction for entertaining, sports gatherings, or weekend dinners.
The appeal
Why you’ll love it
The astonishing crispness in this preparation stems directly from food chemistry. Baking powder creates an alkaline surface environment on the poultry skin, raising the natural pH. This elevated pH accelerates the Maillard reaction, which is the chemical cascade responsible for deep browning and rich roasted flavors. Simultaneously, the leavening compounds react with residual surface moisture to generate microscopic carbon dioxide bubbles across the dermal layer. As dry convective heat circulates beneath and around the elevated wire rack, these tiny pockets expand and desiccate, yielding thousands of crisp blisters. Without this alkaline shift, collagen and fats stew in their own liquids, leading to rubbery skin rather than an audible crunch across every single bite.
Elevating the poultry on a wire rack above a rimmed baking sheet solves the fundamental flaw of flat-pan roasting. When chicken wings sit directly on metal, rendering subcutaneous fat collects underneath, essentially braising the bottom side of each flat and drumette in moisture. Suspending the wings allows heated air currents to envelop all surfaces equally, steadily dehydrating the skin while liquified fat drips away onto the tray below. Furthermore, tossing piping hot wings into a warm butter emulsion ensures rapid adhesion. The ambient heat from the poultry softens the microplane-grated parmesan just enough to bind the garlic and herbs tightly without breaking the butter into greasy puddles or dulling the crisp exterior.
What you need
Ingredients
Makes 24 wings.
Wings
Garlic Parmesan Sauce
For Serving
Contains:
- Milk
- Eggs
Tools
Equipment
- Rimmed baking sheet
- Oven-safe wire cooling rack
- Paper towels
- Large mixing bowl
- Tongs
- Whisk
Swaps
Substitutions
Instead ofUnsalted butter
UseGhee or clarified butter for a richer nutty flavor and higher scorch point.
Instead ofParmesan cheese
UseAged Pecorino Romano or Grana Padano for an intensely sharp, savory finish.
Instead ofRanch dip
UseBlue cheese dip, garlic herb aioli, or warm marinara sauce.
Good to know
Notes
Ingredient quality plays a pivotal role in the final aroma and texture of this appetizer. Seek out whole chicken wings and separate them cleanly at the joints into flats and drumettes, discarding the wing tips or reserving them for homemade poultry stock. It is critical to confirm that the baking powder selected is aluminum-free; standard varieties containing sodium aluminum sulfate introduce an unpleasant metallic or bitter aftertaste when subjected to sustained oven heat. For the cheese, bypass pre-shredded supermarket containers, which contain anti-caking starches like cellulose that impede smooth melting. Choose a wedge of authentic Parmigiano-Reggiano or Grana Padano and grate it finely on a microplane just before assembling the sauce.
Equipment choice directly dictates the crispness of the wings. A heavy, commercial-grade half sheet pan prevents warping under high heat, maintaining an even roasting surface. The wire rack must fit securely inside the rimmed pan and possess an oven-safe coating or stainless-steel construction. Avoid delicate non-stick racks not designed for high oven temperatures above 400°F (204°C). When preparing the sauce, fresh garlic cloves minced finely with a sharp chef's knife provide superior punch compared to jarred garlic, which often carries an acrid brine. Fresh flat-leaf Italian parsley offers a clean, grassy counterpoint, while freshly squeezed lemon juice adds an indispensable sparkle that cuts through rich dairy fat cleanly.
Prep
Before you start
Before beginning the cooking process, establish a clean, organized workspace to streamline assembly and avoid cross-contamination. Thoroughly sanitize cutting boards and counter surfaces. Remove the chicken wings from refrigeration and blot them extensively using durable paper towels until dry to the touch. Measure the aluminum-free baking powder, kosher salt, and freshly ground black pepper into a small prep bowl. Line a sturdy half-sheet baking pan with heavy-duty aluminum foil to facilitate effortless cleanup, and set an oven-safe wire cooling rack directly inside the rimmed pan. Adjust the oven racks so the baking sheet will sit comfortably in the center position, allowing optimal air circulation. Finally, preheat the oven to 425°F (218°C).
Step by step
Method
Phase 1
Phase 1: Drying, Seasoning, and Rack Setup
Step 1: Dry the Chicken Wings
Arrange the chicken wings across a cutting board lined with paper towels. Firmly press additional paper towels over every piece, absorbing all residual surface liquid across flats and drumettes until the skin feels matte and completely dry.
You’ll need: chicken wings
Look for: Skin shows no slick moisture or wet sheen under kitchen lighting.
Tip: Thoroughly dried skin prevents trapped steam from softening the crust during baking.
Step 2: Season with Leavener and Spices
Transfer the dry chicken wings to a clean, dry mixing bowl. Sprinkle the aluminum-free baking powder, kosher salt, and freshly ground black pepper evenly over the wings, tossing continuously until every surface receives a thin, uniform powdery coat.
You’ll need: baking powder · kosher salt · black pepper
Look for: A faint, chalky dust evenly coats every crevice without clumping.
Tip: Ensure the baking powder is aluminum-free to prevent bitter aftertastes at high heat.
Step 3: Arrange on the Wire Rack
Fit an oven-safe wire rack inside a large rimmed baking sheet. Arrange the seasoned wings skin-side up across the rack, spacing them at least half an inch apart so hot air circulates freely around every piece without touching.
Look for: Even spacing with no pieces overlapping or touching one another.
Tip: Line the baking sheet underneath with aluminum foil for quick post-bake cleanup.
Checkpoint
At the conclusion of this initial setup phase, the chicken wings must feel entirely dry, matte, and free of moisture before receiving the seasoning dust. Once tossed with the baking powder, salt, and pepper, the skin should carry an exceptionally thin, uniform, chalky haze across every contour without any clumps of white powder settling in the folds. On the wire rack, the wings should sit neatly aligned in rows with visible clearance between every flat and drumette. The foil beneath should be smooth, ready to catch drippings, and the oven must be fully stabilized at the target temperature.
Phase 2
Phase 2: High-Heat Convective Roasting
Step 4: Initial Bake for Rendering
Slide the prepared sheet pan into an oven preheated to 425°F (218°C) on the middle rack. Bake undisturbed for 25 minutes while the subcutaneous fat slowly liquefies and rendered drippings steadily fall to the sheet pan below.
Look for: Fat renders and drips while skin turns firm and taut.
Tip: Keep the oven door closed to maintain strong ambient convective heat currents.
Step 5: Flip and Crisp to Safe Internal Doneness
Using metal tongs, flip each wing over on the rack. Return to the oven for 20 to 25 minutes, baking until deeply golden and blistered, reaching a safe internal temperature of at least 165°F (74°C) with an instant-read thermometer.
Internal temperature 165°F (74°C)
Look for: Deep amber skin, visible surface micro-blisters, and juices running totally clear.
Tip: Aiming for 175°F to 185°F inside wings breaks down tough collagen into tender gelatin.
Checkpoint
By the end of the second phase, your kitchen will smell rich, roasted, and savory. Visually, the wings must exhibit a blistered, deeply golden exterior with brittle edges that sound hollow and crisp when tapped with metal tongs. Rendered poultry fat will have collected in the bottom of the foil-lined sheet pan, leaving the elevated wings dry and sizzling. Inserting an instant-read meat thermometer into the thickest section of several drumettes without touching the bone should confirm an internal reading of at least 165°F (74°C), and ideally between 175°F and 185°F.
Phase 3
Phase 3: Emulsifying, Glazing, and Plating
Step 6: Whisk the Garlic Parmesan Emulsion
While the wings complete their bake, combine the warm melted unsalted butter, minced garlic, half of the grated parmesan cheese, half of the chopped parsley, and a brisk squeeze of fresh lemon juice in a large heatproof bowl. Whisk thoroughly.
You’ll need: unsalted butter · garlic · parmesan cheese · flat-leaf parsley · lemon
Look for: A fragrant, glossy emulsion forms with suspended green herbs and fine cheese.
Tip: Melted butter should be warm rather than scalding to keep garlic gentle and sweet.
Step 7: Toss Hot Wings in the Glaze
Remove the baking sheet from the oven and immediately dump the sizzling chicken wings directly into the bowl of garlic parmesan sauce. Toss vigorously using a rubber spatula or tongs until every crispy surface glistens with herb-flecked butter.
Look for: Every wing glows with an even, shimmering sheen of buttery glaze.
Tip: Tossing wings straight from the oven allows hot skin to absorb savory garlic notes.
Step 8: Garnish and Serve with Ranch Dip
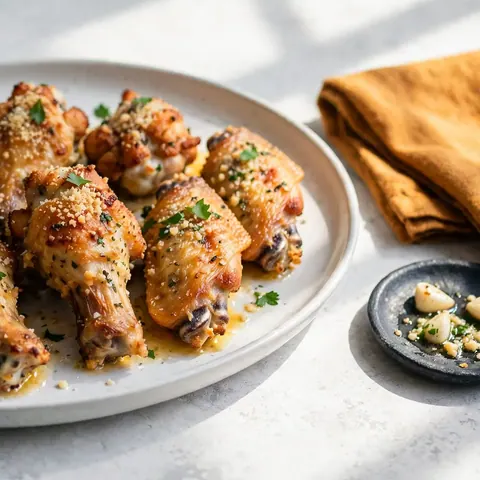
Transfer the glazed wings to a serving platter. Scatter the remaining grated parmesan cheese and chopped parsley over the top. Arrange fresh lemon wedges around the edges and set a bowl of chilled ranch dip alongside the platter.
You’ll need: ranch dip
Look for: A dramatic platter of golden wings topped with fresh herbs, cheese, and lemon.
Tip: Serve immediately to enjoy the contrast between blistering skin and cool dipping sauce.
Checkpoint
At the culmination of the third phase, the butter sauce should present as a cohesive, glossy emulsion with finely minced garlic, bright parsley flakes, and grated cheese evenly suspended rather than separated into oil and solids. Upon tossing, the sizzling hot wings should gleam with an appetizing, fragrant glaze that clings tightly to every crevice without pooling excessively in the bowl. Once plated, the extra snowfall of dry parmesan and vibrant green parsley should adhere neatly to the surface, accompanied by radiant lemon wedges and chilled, velvety ranch dip.
Doneness
How to tell it’s done
Ascertaining proper doneness requires assessing both visual cues and internal temperature readings. While the USDA establishes the safe internal minimum for poultry at 165°F (74°C), chicken wings taste noticeably better when cooked to an internal temperature between 175°F (79°C) and 185°F (85°C). At this higher threshold, the ample connective tissue and collagen within the wing joints fully melt into tender gelatin, while the meat pulls away effortlessly from the bone. Visually, the skin should display an even, deep amber hue with visible micro-blistering along the edges. When pierced with a digital probe thermometer, the escaping juices must run completely clear without any trace of pinkness or cloudiness.
Avoid these
Common mistakes
The most prevalent mistake in oven-baking chicken wings is failing to eliminate surface moisture prior to seasoning. If damp wings enter the oven, the residual moisture instantly turns into trapped steam, neutralizing the leavening effect of the baking powder and producing flaccid, chewy skin. Another frequent pitfall is crowding the baking rack; packing wings together obstructs convective airflow, causing them to steam one another rather than roast. Additionally, cooks often confuse baking powder with baking soda; using baking soda will ruin the wings with a soapy, harsh chemical flavor. Finally, avoid tossing the wings in sauce too far in advance, as resting in butter will gradually soften the crispy exterior.
Cook safely
Food safety
Safe internal temperatures
Cook to at least these temperatures, measured with an instant-read thermometer in the thickest part.
| Food | Minimum internal temperature |
|---|---|
| Poultry | 165°F (74°C) |
Better results
Tips
Tip 1
To maximize crispness beyond standard methods, consider air-drying the seasoned wings uncovered in the refrigerator for four to twelve hours prior to roasting. Placing the wire rack directly onto a sheet tray in the cold, dry refrigerator environment desiccates the dermal layer completely. When dry skin enters an intensely hot oven, the fat renders almost instantly without generating steam, resulting in an exceptionally thin, brittle exterior reminiscent of traditional deep frying. If time allows, this effortless passive step elevates the texture significantly and ensures the skin stays blistered even after meeting the butter.
Tip 2
When preparing the garlic parmesan butter, temperature control is paramount for achieving a silky coating. Melt the butter gently over low heat or in short microwave bursts so it remains pleasantly warm rather than boiling hot. If the butter is scalding when adding the finely grated cheese, the dairy solids will seize and clump into a tough, separated mass rather than melting smoothly into a velvety glaze. Stirring minced garlic into warm butter gently tames its raw, pungent bite, extracting sweet aromatic oils that coat the chicken evenly without scorching the delicate green parsley.
Make it yours
Variations
Spicy Garlic Parmesan Wings
Incorporate half a teaspoon of crushed red pepper flakes and a dash of cayenne pepper directly into the melted butter glaze to balance richness with fiery heat.
Smoked Paprika Garlic Wings
Stir half a teaspoon of Spanish smoked paprika into the dry baking powder seasoning to impart deep woodsy aroma and a vibrant crimson tint.
Truffle Garlic Parmesan Wings
Replace one tablespoon of the melted butter with white truffle oil just before tossing to create an earthy, deeply savory aroma perfect for upscale entertaining.
Lemon Pepper Garlic Wings
Add a teaspoon of finely grated fresh lemon zest and cracked coarse black pepper into the butter sauce for intensified citrus brightness and peppery bite.
On the table
Serving suggestions
Present the finished wings on a wide, heated ceramic platter to prevent the rich butter emulsion from cooling too rapidly at the table. Arrange the drumettes and flats in a cascading pile, highlighting the contrast between the deep golden roasted skin, the vibrant green flecks of Italian parsley, and the white dusting of freshly microplaned cheese. Tuck bright lemon wedges around the edges of the platter, encouraging diners to squeeze extra citrus over their individual portions to heighten acidity and brightness alongside the savory poultry.
Pair these decadent wings with crisp, refreshing sides that offer textural and temperature contrast. A chilled bowl of creamy ranch dip is classic, providing cool herbal creaminess that tames the sharp bite of raw garlic. Crisp celery sticks, carrot batons, or a bitter green salad dressed in light vinaigrette complement the rich butter sauce perfectly. For a complete game day feast, serve alongside warm soft pretzels, roasted potato wedges, or artisanal flatbreads to soak up any remaining garlic parmesan butter left on the plate.
Leftovers
Storage & make-ahead
- Fridge
- Store leftovers in an airtight container in the refrigerator for up to 3 to 4 days; cool within 2 hours.
- Freezer
- Freeze unglazed or glazed cooked wings in a sealed freezer bag for up to 2 months; thaw in the fridge.
- Reheat
- Reheat on a wire rack at 375°F (190°C) for 10 to 12 minutes until sizzling and recrisped; avoid microwaves.
Store leftover chicken wings promptly to preserve food safety and overall quality. Allow the wings to cool at room temperature for no longer than two hours before packing them into shallow, airtight glass or plastic containers. Leftovers can remain refrigerated safely for up to three to four days. Note that once refrigerated, the butter glaze will solidify into an opaque layer, and the crisp skin will naturally soften as it absorbs moisture from the meat. For prolonged storage, wings can be frozen for up to two months, though freezing will somewhat diminish the integrity of the sauce.
Make ahead
While cooked wings tossed in sauce are undeniably best enjoyed immediately, components of this recipe can be prepped well in advance to streamline entertaining. You can break down whole wings, pat them dry, and coat them in the baking powder seasoning up to twenty-four hours ahead, storing them uncovered on their wire rack inside the refrigerator. The garlic, parsley, and parmesan cheese can also be minced, chopped, and grated hours beforehand and stored in separate airtight containers. Cook the wings and emulsify the butter sauce fresh just before serving to preserve optimum crispness.
Questions
Frequently asked questions
Why is baking powder used on the wings?
Baking powder raises the skin's surface pH, accelerating the Maillard browning reaction. It also reacts with moisture to form tiny surface bubbles that crisp into an audibly crackling crust during baking.
Can baking soda be used instead of baking powder?
No, baking soda cannot be substituted. Baking soda is pure sodium bicarbonate and has a far stronger alkaline taste, which will leave the chicken tasting harsh, soapy, and unpleasantly bitter.
How can the wings be kept crispy after tossing?
Toss the wings in warm sauce immediately before serving. Avoid drenching them in excess liquid, and never cover the finished platter with foil, which traps steam and rapidly softens the crisp skin.
Can these wings be cooked in an air fryer?
Yes, cook seasoned wings in a preheated air fryer at 380°F (193°C) for 20 minutes, shaking halfway. Increase temperature to 400°F (204°C) for 5 minutes to crisp, then toss in sauce.
Why does the garlic parmesan sauce sometimes separate?
Sauce separation occurs when butter is overheated or cheese is too cold. Use gently warmed butter and room-temperature, finely grated cheese, whisking continuously to form a stable, smooth emulsion.
Everything in one place: the recipe card below gathers the ingredients, steps and estimated nutrition, ready to print.
Recipe card
Crispy Baked Garlic Parmesan Chicken Wings
Learn how to bake exceptionally crispy chicken wings tossed in rich garlic butter, grated parmesan, fresh parsley, and bright lemon juice.
- Prep
- Cook
- Rest
- Total
- Servings
- 24 wings
Ingredients
Wings
- 3 lb chicken wings, split into flats and drumettes
- 1 tbsp aluminum-free baking powder
- 1 tsp kosher salt
- 1/2 tsp freshly ground black pepper
Garlic Parmesan Sauce
- 6 tbsp unsalted butter, melted
- 4 cloves garlic, minced
- 1/2 cup finely grated parmesan cheese, divided
- 1/4 cup finely chopped fresh flat-leaf parsley, divided
- 1 lemon, cut into wedges for squeezing and serving
For Serving
- 1/2 cup ranch dip, store-bought or made ahead
Instructions
Dry the Chicken Wings. Arrange the chicken wings across a cutting board lined with paper towels. Firmly press additional paper towels over every piece, absorbing all residual surface liquid across flats and drumettes until the skin feels matte and completely dry.
Season with Leavener and Spices. Transfer the dry chicken wings to a clean, dry mixing bowl. Sprinkle the aluminum-free baking powder, kosher salt, and freshly ground black pepper evenly over the wings, tossing continuously until every surface receives a thin, uniform powdery coat.
Arrange on the Wire Rack. Fit an oven-safe wire rack inside a large rimmed baking sheet. Arrange the seasoned wings skin-side up across the rack, spacing them at least half an inch apart so hot air circulates freely around every piece without touching.
Initial Bake for Rendering. Slide the prepared sheet pan into an oven preheated to 425°F (218°C) on the middle rack. Bake undisturbed for 25 minutes while the subcutaneous fat slowly liquefies and rendered drippings steadily fall to the sheet pan below.
Flip and Crisp to Safe Internal Doneness. Using metal tongs, flip each wing over on the rack. Return to the oven for 20 to 25 minutes, baking until deeply golden and blistered, reaching a safe internal temperature of at least 165°F (74°C) with an instant-read thermometer.
Whisk the Garlic Parmesan Emulsion. While the wings complete their bake, combine the warm melted unsalted butter, minced garlic, half of the grated parmesan cheese, half of the chopped parsley, and a brisk squeeze of fresh lemon juice in a large heatproof bowl. Whisk thoroughly.
Toss Hot Wings in the Glaze. Remove the baking sheet from the oven and immediately dump the sizzling chicken wings directly into the bowl of garlic parmesan sauce. Toss vigorously using a rubber spatula or tongs until every crispy surface glistens with herb-flecked butter.
Garnish and Serve with Ranch Dip. Transfer the glazed wings to a serving platter. Scatter the remaining grated parmesan cheese and chopped parsley over the top. Arrange fresh lemon wedges around the edges and set a bowl of chilled ranch dip alongside the platter.
Allergens: Milk, Eggs
Nutrition (estimated, per serving)
- Calories
- 540 kcal
- Protein
- 34 g
- Carbs
- 3 g
- Fat
- 43 g
- Fiber
- 0.5 g
- Sugar
- 0.5 g
- Sodium
- 820 mg
Estimates only: values vary with brands, substitutions and portion sizes.
Recipe by WixForum Kitchen · wixforum.com
Share this recipe
Send it to someone who’d love it, or save it for later.
Spotted a mistake in this recipe? Let us know.
Keep cooking


