Crispy Loaded Potato Skins with Cheddar and Bacon
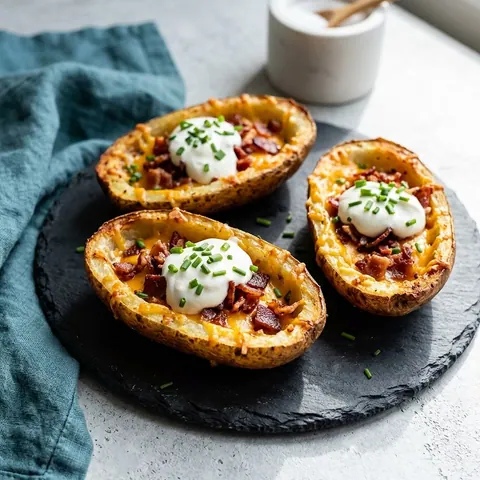
Golden russet potato skins brushed with spiced melted butter, crisped until crunchy, and loaded with melted sharp cheddar, savory bacon, and sour cream.
Published 12 min read
- Total time
- Prep
- Cook
- Rest
- Serves
- 8
- Makes 8 loaded potato skins
- Cuisine
- American
- Calories
- 285
- per serving, estimated

On this page15 sections
Few pub appetizers rival the sensory appeal of bakery-fresh loaded potato skins when prepared with precision. The combination of shattered, deeply browned potato jackets, smoky seasoned butter, melted aged cheddar, and crisp bacon morsels creates an irresistible plate. By mastering proper starch hollow-out technique and a dedicated dual-stage crisping bake, this foolproof recipe elevates classic sports-bar fare into an exceptional homemade showpiece that disappears from serving platters within minutes of leaving the hot oven.
Loaded potato skins represent an iconic staple of casual American tavern culture, celebrated for their hearty balance of crunch, savory meat, rich dairy, and pungent herbs. While many fast-casual kitchens settle for soggy, microwave-reheated frozen shells, constructing them from scratch yields a noticeably superior appetizer. The natural sweetness and fluffy interior of russet potatoes provide an ideal foundation for aromatic fat, sharp cheddar cheese, and salty cured pork. This recipe walks through every foundational step, from the primary tenderizing bake and delicate hollowing to the high-heat butter roasting that guarantees true crunchiness before any toppings are added. The result is a beautifully composed finger food suitable for game-day parties, casual gatherings, or indulgent weekend dinners.
The appeal
Why you’ll love it
The architectural success of a potato skin depends entirely on driving moisture out of the outer peel before melting cheese on top. Raw potato skin naturally contains substantial water trapped in cellular walls. By fully baking the whole potato first, cooling it slightly, and paring away the bulk of the internal starch while leaving a one-quarter-inch rim, you create a lightweight shell. Applying melted butter seasoned with smoked paprika and salt creates an oily barrier that fries the exterior cellular matrix during the high-heat secondary bake. Exposing both the outside and inside surfaces to intense circulating air ensures starch gelatinization occurs uniformly, yielding brittle rigidity that will not collapse under heavy fillings.
Layering temperature contrast and fat solubility is what makes the final dish sing on the palate. Sharp cheddar possesses a high proportion of butterfat and protein that requires gentle, quick heat to melt smoothly without separating into an oily pool. Placing pre-cooked, crumbled bacon directly over the cheese allows smoky rendered notes to infuse the melting dairy as it bubbles in the oven. Finishing the piping-hot, molten shells with chilled, cultured sour cream and sharp, allium-rich chives delivers dynamic temperature relief, cutting through rich dairy richness while balancing the smoky earthiness of paprika and cured pork across every single bite.
What you need
Ingredients
Makes 8 loaded potato skins.
Potatoes
Seasoning
Filling
Garnish
Contains:
- Milk
Tools
Equipment
- Rimmed baking sheet
- Parchment paper or wire baking rack
- Pastry brush
- Chef's knife and cutting board
- Small mixing bowl
- Spoon or small melon baller
Swaps
Substitutions
Instead ofSharp cheddar cheese
UseShredded Monterey Jack, Colby, or sharp white cheddar
Instead ofUnsalted butter
UseEqual amount of olive oil, avocado oil, or melted ghee
Instead ofFresh chives
UseThinly sliced green onion tops or fresh minced scallions
Good to know
Notes
Selecting the right potato variety is paramount for crisp appetizer shells. High-starch, low-moisture russet potatoes, specifically Idaho or Burbank russets, are the gold standard. Their dry, mealy texture separates effortlessly from the skin during hollowing, while their thick, fibrous jackets brown dramatically without turning leathery. Avoid waxy red, fingerling, or yellow varieties, which retain too much internal moisture and will become limp and chewy rather than crisp. Look for medium-sized, symmetrical potatoes that provide uniform shell boats of roughly equal thickness and weight.
Ingredient quality among the fillings dictates overall flavor harmony. Freshly grated sharp or extra-sharp cheddar melts cleaner and delivers far punchier tang than pre-shredded packaged cheeses, which contain cellulose anti-caking agents that hinder smooth melting. For the bacon, thick-cut hardwood-smoked bacon cooked until shatteringly crisp ensures textural presence against the creamy cheese. Opt for traditional full-fat sour cream for rich body, and use freshly snipped chives or scallion greens to deliver clean allium brightness that cuts the heavy richness of melted butter and sharp cheddar across the entire platter.
Prep
Before you start
Before beginning the recipe, ensure all workspace stations and ingredients are prepared systematically. Thoroughly wash the whole russet potatoes under cold running water using a vegetable brush to eliminate surface dirt, then dry them completely with clean kitchen towels. Preheat the oven to 400°F (204°C) and adjust the main wire rack to the center position. Measure out the unsalted butter and melt it gently in a small heatproof bowl. Fry or bake your bacon strips until crisp, drain them on paper towels, and crumble them into bite-sized morsels. Shred the cheddar cheese from a fresh block, snip the fresh chives into thin rounds, and set the sour cream nearby in the refrigerator until final plating.
Step by step
Method
Phase 1
Baking, Resting, and Scooping
Step 1: Initial Potato Baking
Preheat the oven to 400°F (204°C). Pierce each scrubbed russet potato several times with a fork to allow steam to escape during baking. Place the whole potatoes directly on the oven center rack or onto a rimmed baking sheet and bake for 45 to 55 minutes until completely tender throughout.
You’ll need: medium russet potatoes
Look for: A paring knife or cake tester glides smoothly through the potato centers with zero resistance.
Tip: Drying the potato skins thoroughly after washing ensures the exterior skin bakes firm rather than steaming soft.
Step 2: Cooling and Halving
Transfer the hot baked potatoes to a sturdy cutting board and let them rest for roughly 10 minutes until safe to handle. Use a sharp chef knife to slice each potato lengthwise into two equal, symmetrical halves, making clean, even cuts without tearing the outer skin.
Look for: The potatoes feel comfortably warm to touch while the internal steam has subsided enough to handle.
Tip: Slice straight down in one smooth stroke to maintain neat, intact borders around the perimeter.
Step 3: Scooping the Flesh
Carefully scoop out the fluffy center flesh using a soup spoon, leaving a sturdy rim and base approximately one-quarter inch thick against the skin. Reserve the extracted potato flesh in a bowl for another recipe, taking care not to puncture or split the delicate potato shell walls.
Look for: The shells resemble sturdy, hollow boats with an even, thin border of tender potato flesh.
Tip: Leave slightly more thickness around the corners to give the shells structural stability when loaded later.
Checkpoint
At the conclusion of the initial phase, the potatoes should be thoroughly tender inside and cool enough to handle securely with bare hands without burning fingers. When sliced down the center, clean steam releases, exposing a snowy, fluffy interior crumb. The scooped cavities should display smooth, uniform one-quarter-inch margins around the bottom and sides, resembling sturdy rustic wooden canoes. The reserved fluffy flesh should sit neatly in a storage bowl, completely free of torn brown skin fragments, ready for repurposing into fluffy mashed potatoes or potato cakes.
Phase 2
Seasoning and Dual-Side Crisping
Step 4: Seasoned Butter Preparation
In a small heatproof bowl, combine the melted butter, kosher salt, and smoked paprika. Stir vigorously with a small fork or pastry brush until the reddish spice and salt grains are uniformly distributed throughout the warm fat, preventing any paprika clumps from forming.
You’ll need: unsalted butter · kosher salt · smoked paprika
Look for: The butter mixture turns a vibrant crimson hue with no visible spice granules settled on the bottom.
Tip: Keep the melted butter warm so it stays fully liquid and glides evenly over the potato flesh.
Step 5: Brushing and First Crisp
Line a rimmed baking sheet with parchment paper. Generously brush both the insides and the outer skins of all potato shells with the seasoned butter mixture. Place them skin-side up on the baking sheet and bake at 400°F (204°C) for 8 minutes to firm the exterior.
Look for: The exterior skins begin to darken, sizzle softly, and develop a crisp, slightly taut texture.
Tip: Baking the shells skin-side up first allows direct heat to draw surface moisture out of the peel.
Step 6: Flipping and Deep Browning
Remove the baking sheet from the oven and carefully flip each potato skin cavity-side up using metal tongs. Brush the exposed interior flesh with any remaining seasoned melted butter. Return the sheet to the 400°F (204°C) oven and bake for an additional 7 minutes.
Look for: The exposed interior edges turn light golden amber and the surface starch forms a brittle crust.
Tip: Do not skip flipping; exposing both surface layers to dry heat creates crispness throughout every single bite.
Checkpoint
By the end of the crisping phase, the potato shells must feel noticeably rigid, lightweight, and firm to the touch when gently tapped with metal tongs. The seasoned butter should be completely absorbed, staining the interior and exterior surfaces with a faint, rustic amber-orange hue from the paprika. A light sizzle will be audible as the sheet pan emerges from the oven, and the aroma of toasted starch and nutty browned butter should dominate the kitchen. There should be no soft, damp spots remaining across the interior flesh.
Phase 3
Melting, Assembling, and Garnishing
Step 7: Loading Cheese and Bacon
Divide the shredded sharp cheddar cheese evenly among all eight hollowed potato shells. Scatter the crumbled cooked bacon across the shredded cheese layer, distributing it evenly so every bite receives savory smokiness. Keep the fillings tucked neatly within the perimeter walls of each skin.
You’ll need: shredded sharp cheddar cheese · cooked bacon
Look for: The hollowed shells are generously mounded with cheese shreds and studded throughout with crispy bacon pieces.
Tip: Shred block cheddar fresh rather than pre-bagged; un-dusted cheese melts into a richer, creamier blanket.
Step 8: Final Melt and Garnish
Return the loaded skins to the oven for 5 to 7 minutes until the cheddar melts thoroughly and bubbles along the edges. Remove from the oven, arrange on a serving board, and crown each hot skin with a dollop of cool sour cream and freshly chopped chives.
You’ll need: sour cream · fresh chives
Look for: The cheese is glossy, bubbling, and fully melted, contrasting against the cold sour cream dollop.
Tip: Dollop sour cream immediately prior to serving so the chilled cream stays firm against the hot cheese.
Checkpoint
At the final checkpoint, the shredded cheddar must form an unbroken, glossy blanket completely sealing the bacon pieces beneath its molten surface. The perimeter edges of the cheese should show lively micro-bubbles without separating into pooled grease. When transferred to a serving board, the shells retain their structure completely without bowing in the center. Fresh white dollops of chilled sour cream create stark visual contrast against the deep orange cheese, crowned cleanly with bright green chive rounds, emitting rich savory aromas of wood smoke, dairy, and alliums.
Doneness
How to tell it’s done
Determining doneness occurs across two distinct milestones in this multi-stage bake. During the initial whole-potato roasting stage, doneness is reached when a paring knife, thin skewer, or cake tester slides effortlessly into the thickest center with zero resistance; the skin will appear dry, brittle, and slightly wrinkled. In the final stage after loading the toppings, proper doneness is achieved when the shredded cheddar is completely liquid, glossy, and actively bubbling along the perimeter rim, with slight golden blistering along the edges. The crumbled bacon will appear hot, glistening, and deeply fragrant, while the shell base remains shatteringly crisp and rigid when lifted with a pair of metal tongs.
Avoid these
Common mistakes
The most frequent mistake when making homemade potato skins is aggressive hollowing. Scraping away all potato flesh down to the paper-thin skin leaves the shells fragile, causing them to tear, slump, or become unpleasantly dry like cardboard. Always leave an intentional border of one-quarter inch of fluffy potato flesh against the skin. Another common error is neglecting the second pre-crisping bake. Dumping cold cheese directly into freshly scooped, un-toasted potato shells results in a soggy, waterlogged appetizer. The shells must be coated in seasoned fat and baked until audibly crisp on both sides before any cheese, meat, or cold toppings are introduced to the cavities.
Better results
Tips
Tip 1
To achieve maximum crispiness on the bottom shells, elevate them on a stainless-steel wire cooling rack set directly inside your rimmed baking sheet during the crisping phase. This elevated positioning permits hot dry oven air to swirl completely beneath the potato skins, eliminating moisture condensation on the pan bottom and producing a 360-degree crunch without requiring you to turn them midway through roasting. Keep the melted butter warm throughout the brushing process so it saturates the potato flesh evenly rather than congealing into thick streaks.
Tip 2
Do not waste the scooped potato flesh extracted from the skins during phase one. This pre-baked, fluffy russet interior makes an outstanding base for silky garlic mashed potatoes, shepherd's pie toppings, potato gnocchi, or crispy morning potato pancakes. Store the leftover flesh in an airtight container in the refrigerator for up to three days, mashing it with a little cream, warm milk, and butter whenever you are ready to prepare a secondary meal, ensuring zero kitchen waste from your appetizer project.
Make it yours
Variations
Smoky Barbecue Pork Skins
Stir two tablespoons of your favorite barbecue sauce into the scooped cavities, then layer with shredded pulled pork alongside the sharp cheddar cheese. Bake until bubbling and top with pickled red onions and chopped scallions.
Spicy Jalapeño Popper Skins
Spread a thin layer of softened cream cheese mixed with diced fresh jalapeños inside the crisped shells before topping with Monterey Jack and bacon. Bake until bubbly and finish with sliced fresh jalapeño rings.
Broccoli Cheddar Skins
Replace the crumbled bacon with finely chopped steamed broccoli florets tossed with garlic powder. Top generously with extra sharp cheddar, bake until molten, and crown with sour cream and fresh chives.
Chili Cheese Loaded Skins
Spoon warm thick beef or vegetarian bean chili into the crisped potato shells, cover with a generous mound of shredded cheddar, bake until melted, and finish with sour cream and diced red onion.
On the table
Serving suggestions
Present the loaded potato skins hot directly from the oven on a wooden cutting board, slate platter, or heavy ceramic tray lined with parchment paper. Arrange them in neat parallel rows or an overlapping fan shape to showcase the colorful contrast of golden cheese, dark bacon bits, white sour cream, and vibrant green chives. Accompany the platter with extra bowls of chilled sour cream, fresh pickled jalapeño slices, and tangy barbecue or hot sauce on the side for guests who prefer personalized condiment combinations.
These hearty, savory finger foods pair seamlessly with casual entertaining menus. Serve them alongside classic pub favorites such as crispy buffalo chicken wings, warm soft pretzels with beer cheese dip, fresh vegetable crudités with blue cheese dressing, or a crisp green garden salad dressed with zesty vinaigrette. For beverage pairings, crisp lagers, hoppy pale ales, rich stouts, or chilled dry ciders provide bright effervescence and acidity that cleanse the palate between rich bites of cheddar and bacon.
Leftovers
Storage & make-ahead
- Fridge
- Store in an airtight container lined with paper towels in the refrigerator for up to 3 days. Chill within 2 hours of baking.
- Freezer
- Freeze fully baked, un-garnished shells on a sheet pan until solid, then pack in freezer bags for up to 2 months. Reheat from frozen.
- Reheat
- Bake on a rimmed sheet at 375°F (190°C) for 10 to 12 minutes until heated through and crisp. Avoid using a microwave to prevent sogginess.
Store leftover loaded potato skins in an airtight container lined with a sheet of paper towel to absorb ambient moisture. Keep the refrigerated skins un-garnished if possible, or gently scrape off excess sour cream before packing to avoid introducing sogginess to the crispy base. Stored properly at or below 40°F (4°C), the potato skins will maintain their quality for up to three days. For safety, ensure cooked leftovers are transferred to the refrigerator within two hours of leaving the oven. Avoid storing hot potatoes in closed containers, as trapped steam softens the crisp exterior instantly.
Make ahead
Potato skins are an exceptional candidate for advance party preparation. Complete the initial baking, cooling, hollowing, buttering, and initial crisping phases up to 24 hours beforehand. Arrange the crisped, empty shells on a parchment-lined baking sheet, cover them loosely with foil, and refrigerate until party time. Store your shredded cheese and cooked bacon in separate containers. When guests arrive, simply load the cold shells with cheddar and bacon, then bake at 400°F (204°C) for 10 to 12 minutes until hot and bubbly throughout, finishing with sour cream and chives immediately before presentation.
Questions
Frequently asked questions
Can potato skins be prepared ahead of time for a party?
Yes, potato skins can easily be prepped in advance. Complete the baking, scooping, and initial butter crisping steps up to one day early. Keep the hollowed shells chilled on a covered tray, then fill with cheese and bacon and bake right before serving.
Why do homemade potato skins sometimes turn out soggy?
Sogginess occurs when the shells are filled before undergoing an initial high-heat crisping step, or when too much moist potato flesh is left inside. Brushing both sides of the hollowed shell with melted butter and roasting at 400°F (204°C) drives off excess moisture.
What should be done with the scooped potato flesh?
The scooped flesh makes an excellent base for several secondary dishes. Store it in an airtight container in the refrigerator to make creamy mashed potatoes, potato soup, crispy skillet hash browns, or potato croquettes without any kitchen waste.
Can potato skins be crisped in an air fryer?
Yes, an air fryer works exceptionally well for crisping potato skins. Place the hollowed, buttered shells in the basket and cook at 380°F (193°C) for 5 minutes, then add cheese and bacon and cook for another 3 minutes until melted.
Can frozen store-bought potato skins be substituted here?
While frozen pre-made shells can be used in an emergency, freshly baked russet potatoes deliver significantly superior flavor, crispness, and structural integrity. Scratch-made skins avoid the dry, leathery texture often found in commercially frozen potato appetizer shells.
Everything in one place: the recipe card below gathers the ingredients, steps and estimated nutrition, ready to print.
Recipe card
Crispy Loaded Potato Skins with Cheddar and Bacon
Golden russet potato skins brushed with spiced melted butter, crisped until crunchy, and loaded with melted sharp cheddar, savory bacon, and sour cream.
- Prep
- Cook
- Rest
- Total
- Servings
- 8 loaded potato skins
Ingredients
Potatoes
- 4 medium russet potatoes, scrubbed clean and dried
Seasoning
- 4 tbsp unsalted butter, melted
- 1 tsp kosher salt
- 1/2 tsp smoked paprika
Filling
- 1 1/2 cups shredded sharp cheddar cheese
- 6 slices cooked bacon, crumbled
Garnish
- 1/2 cup sour cream
- 2 tbsp fresh chives, finely chopped
Instructions
Initial Potato Baking. Preheat the oven to 400°F (204°C). Pierce each scrubbed russet potato several times with a fork to allow steam to escape during baking. Place the whole potatoes directly on the oven center rack or onto a rimmed baking sheet and bake for 45 to 55 minutes until completely tender throughout.
Cooling and Halving. Transfer the hot baked potatoes to a sturdy cutting board and let them rest for roughly 10 minutes until safe to handle. Use a sharp chef knife to slice each potato lengthwise into two equal, symmetrical halves, making clean, even cuts without tearing the outer skin.
Scooping the Flesh. Carefully scoop out the fluffy center flesh using a soup spoon, leaving a sturdy rim and base approximately one-quarter inch thick against the skin. Reserve the extracted potato flesh in a bowl for another recipe, taking care not to puncture or split the delicate potato shell walls.
Seasoned Butter Preparation. In a small heatproof bowl, combine the melted butter, kosher salt, and smoked paprika. Stir vigorously with a small fork or pastry brush until the reddish spice and salt grains are uniformly distributed throughout the warm fat, preventing any paprika clumps from forming.
Brushing and First Crisp. Line a rimmed baking sheet with parchment paper. Generously brush both the insides and the outer skins of all potato shells with the seasoned butter mixture. Place them skin-side up on the baking sheet and bake at 400°F (204°C) for 8 minutes to firm the exterior.
Flipping and Deep Browning. Remove the baking sheet from the oven and carefully flip each potato skin cavity-side up using metal tongs. Brush the exposed interior flesh with any remaining seasoned melted butter. Return the sheet to the 400°F (204°C) oven and bake for an additional 7 minutes.
Loading Cheese and Bacon. Divide the shredded sharp cheddar cheese evenly among all eight hollowed potato shells. Scatter the crumbled cooked bacon across the shredded cheese layer, distributing it evenly so every bite receives savory smokiness. Keep the fillings tucked neatly within the perimeter walls of each skin.
Final Melt and Garnish. Return the loaded skins to the oven for 5 to 7 minutes until the cheddar melts thoroughly and bubbles along the edges. Remove from the oven, arrange on a serving board, and crown each hot skin with a dollop of cool sour cream and freshly chopped chives.
Allergens: Milk
Nutrition (estimated, per serving)
- Calories
- 285 kcal
- Protein
- 9.5 g
- Carbs
- 24 g
- Fat
- 17.5 g
- Fiber
- 2.2 g
- Sugar
- 1.4 g
- Sodium
- 460 mg
Estimates only: values vary with brands, substitutions and portion sizes.
Recipe by WixForum Kitchen · wixforum.com
Share this recipe
Send it to someone who’d love it, or save it for later.
Spotted a mistake in this recipe? Let us know.
Keep cooking


