No-Bake Lemon Cheesecake Jars with Graham Crumble
Layers of buttery graham cracker crust, velvety lemon cream cheese filling, and tangy lemon curd come together in individual chilled dessert jars.
Published 11 min read
- Total time
- Prep
- Cook
- Rest
- Serves
- 4
- Makes 4 jars
- Cuisine
- American
- Calories
- 480
- per serving, estimated

On this page15 sections
Bright citrus aromas and velvety cream cheese come together in these charming no-bake dessert jars, offering all the satisfying richness of traditional cheesecake without the oven heat, water baths, or cracking worries. Whether assembled for a casual summer dinner or prepped ahead for an elegant gathering, these layered jars deliver bakery-quality appeal with minimal fuss. Crisp, buttery graham crumbs anchor a cloud of vibrant lemon filling, capped by luscious curd for a balanced finish.
Individual jar desserts combine practical elegance with reliable portioning, making them an ideal choice for entertaining and low-stress weeknight cooking. This recipe streamlines classic dessert technique by pairing an aerated, folded cream cheese base with a crisp toasted cracker foundation and tangy prepared lemon curd. Every spoonful balances contrasting textures, from the crumbly butter base to the smooth lemon cream and glossy fruit topping. Requiring zero oven time and only basic kitchen tools, the entire assembly moves swiftly from pantry prep to refrigerator setting, creating an impressive display that feels both refined and accessible.
The appeal
Why you’ll love it
The architectural success of these jars relies on folding separately whipped heavy cream into softened cream cheese rather than beating liquid cream directly into the base. Whipping the cream first incorporates a dense network of stable air bubbles that provide loft, structure, and a light mousse consistency without calling for gelatin or baked egg binders. The addition of acidic lemon juice actively tightens the dairy proteins, helping the cream cheese set firmly as it chills. This interaction ensures the filling holds clean, distinct layers inside the glass jars while retaining a remarkably tender melt-in-the-mouth texture.
Balancing sweetness and sharp acidity creates depth that prevents rich dairy desserts from tasting heavy or cloying. Incorporating both freshly grated lemon zest and strained juice provides multifaceted citrus flavor: the zest contributes essential oils that produce lasting floral aroma, while the juice delivers the immediate bright tang that cuts through dense dairy fat. Pressing the crust into individual glass containers protects the delicate butter-bound crumbs from absorbing excessive moisture too quickly, preserving that essential contrast between crunchy base, silky cream, and glossy, tart curd throughout every bite.
What you need
Ingredients
Makes 4 jars.
Crust
Cheesecake Filling
Topping and Garnish
Contains:
- Gluten
- Eggs
- Milk
Tools
Equipment
- 4 small glass jars (about 6 to 8 ounces each)
- Medium mixing bowl
- Handheld electric mixer or stand mixer
- Whisk
- Silicone spatula
- Piping bag or zip-top bag
- Citrus zester or microplane
Swaps
Substitutions
Instead ofGraham cracker crumbs
UseCrushed vanilla wafers, digestive biscuits, or shortbread cookies in equal measure.
Instead ofLemon curd
UsePrepared passion fruit curd, raspberry coulis, or lime curd in equal volume.
Instead ofPowdered sugar
UseSuperfine granulated sugar dissolved thoroughly into the cream cheese, or sieved organic confectioners' sugar.
Good to know
Notes
Selecting standard full-fat brick-style cream cheese is essential for proper stability and setting in no-bake desserts. Spreadable tub varieties contain higher moisture contents and added gums that prevent the filling from firming into a clean, spoonable structure. For the citrus components, always wash and dry fresh lemons before zesting only the bright yellow peel, avoiding the bitter white pith beneath. Freshly squeezed juice provides a clean, punchy brightness that bottled concentrates simply cannot replicate, ensuring the flavor profile remains vibrant and authentic.
When working with the crust, standard honey graham crackers offer classic warmth, but digestive biscuits or crisp vanilla wafers work equally well depending on local pantry availability. Glass mason jars or small juice tumblers ranging from six to eight ounces showcase the contrasting layers beautifully while maintaining neat portions. If a piping bag is unavailable, a durable gallon freezer bag with one bottom corner snipped serves as a mess-free alternative for channeling the dense filling cleanly into narrow jar openings.
Prep
Before you start
Before beginning assembly, measure out all ingredients and ensure the cream cheese has rested on the counter until fully softened to room temperature, which guarantees an ultra-smooth blend without dense pockets. Place the heavy cream, mixing bowl, and beaters into the refrigerator or freezer for ten minutes so they remain thoroughly cold during aeration. Wash and dry the lemons thoroughly before zesting and juicing, and set out four clean, dry glass jars on your workspace to streamline the layering process.
Step by step
Method
Phase 1
Phase 1: Crust Preparation and Packing
Step 1: Mix the Graham Crumble
Place the graham cracker crumbs into a medium bowl, add the melted unsalted butter and granulated sugar, and stir with a fork or spatula until the mixture resembles wet sand and holds together loosely when pinched.
You’ll need: graham cracker crumbs · unsalted butter · granulated sugar
Look for: The crumbs appear uniformly moistened without dry floury pockets or loose butter pooling at the bottom.
Tip: Reserve two tablespoons of the crumble mixture on the side to use later for the finishing layer.
Step 2: Press the Crust into Jars
Distribute the remaining moistened crumbs evenly among the four glass jars, then gently press the crumble into the bottom of each jar using the flat end of a small spice jar or clean spoon to create a solid base.
Look for: A flat, compacted layer of crust lines the base of each jar without loose crumbs climbing up the sides.
Tip: Press firmly enough to compact the crust so it does not lift when piping the filling, but avoid crushing too hard.
Checkpoint
The crushed graham cracker mixture should resemble dark, damp sand that clusters readily when squeezed between your fingers without leaking melted butter. In the jars, the base should appear level and firmly settled across the glass bottom, leaving no loose dry crumbs drifting upward. A fragrant, sweet honey-butter aroma should rise from the jars, confirming that the butter has fully coated the cracker crumbs before the filling arrives.
Phase 2
Phase 2: Aerated Lemon Cream Assembly
Step 3: Whip the Heavy Cream
Pour the cold heavy cream into a chilled bowl and beat on medium-high speed using a whisk or electric mixer until stiff peaks form, making sure not to overbeat past the point of glossy stability.
You’ll need: heavy cream
Look for: The cream holds sharp, upright points when the beaters are lifted and clings to the bowl without slumping.
Tip: Keep the bowl and beaters in the freezer for ten minutes beforehand to accelerate whipping and maintain volume.
Step 4: Beat the Cream Cheese Base
In a separate mixing bowl, beat the softened cream cheese with the powdered sugar, freshly grated lemon zest, fresh lemon juice, and vanilla extract on medium speed until entirely smooth, creamy, and free of lumps.
You’ll need: cream cheese · powdered sugar · lemon zest · lemon juice · vanilla extract
Look for: The mixture turns pale, satiny, and completely uniform with fine specks of yellow zest distributed throughout.
Tip: Scrape the sides and bottom of the bowl frequently with a silicone spatula to incorporate all sugar pockets.
Step 5: Fold the Whipped Cream into the Cheese
Gently fold the whipped cream into the lemon cream cheese mixture using broad, sweeping strokes with a silicone spatula, rotating the bowl until fully combined into a light, mousse-like consistency without deflating the aerated cream.
Look for: A seamless, cloud-like lemon cream forms with no distinct streaks of white whipped cream or dense cream cheese.
Tip: Work in two additions, loosening the dense base with one third of the whipped cream before folding in the remainder.
Checkpoint
The whipped cream must stand in glossy, defined peaks before it is introduced to the cheese base. Meanwhile, the cream cheese mixture should appear completely satin-smooth, glossy, and pale yellow with fine specks of citrus peel evenly distributed. When the two elements are folded together, the final filling should look light, uniform, and voluminous, with a bright citrus scent and zero white streaks or unblended dense cream cheese patches.
Phase 3
Phase 3: Layering, Curd Topping, and Chilling
Step 6: Pipe the Filling into Jars
Transfer the lemon cheesecake filling into a piping bag or large zip-top bag with the corner snipped off, and pipe the mixture smoothly into the jars over the pressed crusts, filling each about three-quarters full.
Look for: The creamy layer sits level and snug against the glass walls without creating deep air pockets along the sides.
Tip: Keep the piping tip centered and steady just above the surface as you squeeze to prevent air gaps against the glass.
Step 7: Layer Lemon Curd and Crumbs
Spoon two tablespoons of lemon curd over the cheesecake layer in each jar, gently tilting to spread it evenly across the surface, then sprinkle the reserved graham cracker crumbs over the curd layer.
You’ll need: lemon curd
Look for: A glossy yellow curd ribbon covers the cream completely, topped with a delicate scattering of golden crumbs.
Tip: Stir the curd briskly with a small fork before spooning to loosen its structure for effortless, clean spreading.
Step 8: Chill and Garnish
Cover the jars and refrigerate for at least two hours until the filling is chilled and firm, then garnish each jar with a fresh lemon slice and a sprig of fresh mint just before serving.
You’ll need: lemon slices · fresh mint
Look for: The filling resists slight jiggling and feels set when touched lightly, adorned with vibrant citrus and herb accents.
Tip: Add the fresh mint sprigs only at the final minute to prevent wilting or browning in the refrigerator humidity.
Checkpoint
The piped filling should fill the jars evenly without leaving deep air gaps along the glass perimeter. The lemon curd must sit as a distinct, glossy amber ribbon across the top of the pale cream, neatly dusted with the reserved golden crumbs. After two hours of chilling, the surface should feel softly set to a gentle touch, cold throughout, and fully receptive to the fresh lemon slices and mint leaves.
Doneness
How to tell it’s done
These no-bake cheesecake jars achieve optimal texture once the chilled dairy fats and aerated cream have set into a firm yet yielding consistency, typically after two hours in a refrigerator held below 40°F (4°C). When gently tilted, the jars should show no liquid movement beneath the curd layer. A clean spoon dipped into the top should encounter smooth resistance through the mousse-like cream and break cleanly into the buttery base without dragging soupy filling across the glass sides.
Avoid these
Common mistakes
The most frequent error in no-bake cheesecakes is using cold cream cheese, which produces stubborn lumps that no amount of folding can eliminate without overworking the mixture and breaking the emulsion. Another common pitfall is overwhipping the heavy cream into dry, grainy curds before folding, which ruins the silky mouthfeel of the dessert. Additionally, avoid over-pressing the graham crust into an impenetrable solid block; a gentle, firm press is sufficient to create a stable base that yields easily to a spoon.
Better results
Tips
Tip 1
To achieve clean, professional-looking glass walls without smudges, pipe the cream cheese mixture directly into the center of each jar, allowing the filling to push outward toward the glass rather than spooning it down the sides. If small air pockets appear along the perimeter, gently tap the base of the jar on a folded kitchen towel on the counter to settle the filling before adding the curd. This creates crisp, photogenic color bands visible through the clear glass.
Tip 2
When folding the whipped cream into the lemon cream cheese base, start by incorporating about one-third of the cream vigorously to lighten the dense cheese mixture. Once the base is loosened, gently fold in the remaining whipped cream with broad, sweeping movements from the bottom of the bowl upward. This staged approach preserves the delicate microscopic air bubbles you worked hard to whip into the cream, resulting in a featherlight, velvety texture that never feels heavy.
Make it yours
Variations
Berry Swirl Cheesecake Jars
Spoon a tablespoon of seeded raspberry or blueberry jam directly over the graham crust before piping the cream, creating an additional fruity layer beneath the tangy lemon filling.
Gingersnap Citrus Jars
Substitute crushed spiced gingersnap cookies for the graham crackers in equal quantity, introducing a warm, spicy ginger bite that contrasts beautifully with the tart, chilled lemon curd.
Toasted Coconut Lemon Jars
Fold two tablespoons of finely shredded toasted coconut into the crust crumble and sprinkle an extra pinch over the curd topping along with the mint for tropical textural crunch.
Lime Curd Parfaits
Replace the lemon zest, juice, and topping with fresh lime zest, key lime juice, and prepared lime curd for a sharp, tropical twist on the classic no-bake dessert format.
On the table
Serving suggestions
Present the chilled jars on a simple serving platter or individual dessert plates accompanied by long dessert spoons that reach comfortably to the bottom of the glass. The visual contrast between the rustic golden crust, pale lemon mousse, vibrant curd, and vibrant green mint sprig creates an eye-catching centerpiece for spring luncheons, summer barbecues, or formal dinner parties. Serve them straight from the refrigerator so the layers remain refreshingly cold and distinct.
Pair these bright, tangy treats with complementary beverages that balance their sweet and citrusy richness. An iced herbal mint tea, cold-brew floral iced tea, or a delicate sparkling water garnished with fresh berries enhances the bright profile of the lemon curd. For an evening dessert course, offer the jars alongside espresso or a light dessert wine, allowing the brisk acidity of the citrus to cleanse the palate after a hearty meal.
Leftovers
Storage & make-ahead
- Fridge
- Store sealed jars in the refrigerator for up to 4 days; keep chilled until serving to maintain firm texture.
- Freezer
- Freezing is not recommended as thawed dairy and curd layers tend to separate and become watery.
Store assembled jars tightly sealed with their lids or covered snugly with plastic wrap in the refrigerator at or below 40°F (4°C) for up to four days. The graham crust will soften slightly over time as it rests beneath the moist filling, but the flavors of lemon zest, cream, and curd will meld harmoniously. Always keep the jars chilled until the moment of service to preserve the structural stability of the whipped dairy filling.
Make ahead
These individual jars are exceptionally well-suited for advance preparation and can be assembled through the chilling step up to twenty-four hours before hosting an event. Assembling them the evening prior allows the lemon flavors to blossom fully while ensuring the cream sets into an impeccably clean, sliceable consistency. Hold off on adding the fresh mint leaves and delicate lemon wheel garnishes until just before bringing the jars to the table to prevent wilting.
Questions
Frequently asked questions
Why is the cheesecake filling runny instead of firm?
A loose filling typically occurs when the heavy cream is underwhipped before folding or if warm cream cheese is used, which melts dairy fats. Ensure the heavy cream is whipped to true stiff peaks and chill the assembled jars for at least two hours to allow the fats to solidify properly.
Can reduced-fat cream cheese be used in this recipe?
Standard full-fat brick cream cheese is strongly recommended. Reduced-fat versions and tub spreads contain significantly higher water contents and extra stabilizers that prevent no-bake fillings from setting firmly, often leaving the jars watery and soft rather than rich and cleanly spoonable.
How can lumps be avoided in the cheesecake filling?
Lumps form when cold cream cheese is beaten with powdered sugar. Soften the cream cheese fully at room temperature for at least an hour until easily pressed with a finger, and beat it thoroughly until completely smooth before incorporating the remaining flavorings and whipped cream.
Can these dessert jars be prepared ahead of time?
Yes, these jars are ideal for making up to twenty-four hours in advance. Keep them tightly covered in the refrigerator so they do not absorb lingering food odors, and add the fresh lemon slices and mint leaves just before placing them on the table.
What size jars work best for these portions?
Six-ounce or eight-ounce straight-sided glass canning jars or juice glasses work ideally. They provide ample vertical clearance to showcase the distinct color bands of crust, cream, and curd while ensuring an evenly balanced ratio of crust to filling in every spoonful.
Everything in one place: the recipe card below gathers the ingredients, steps and estimated nutrition, ready to print.
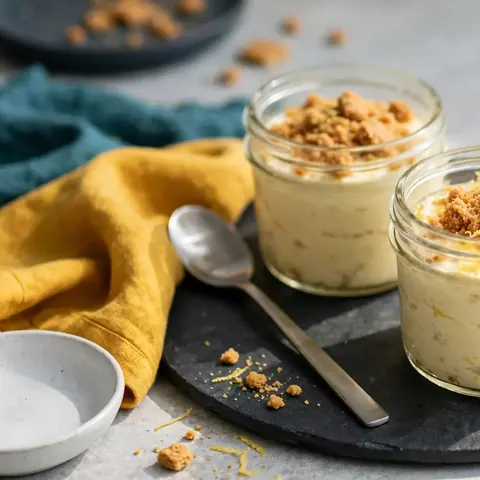
Recipe card
No-Bake Lemon Cheesecake Jars with Graham Crumble
Layers of buttery graham cracker crust, velvety lemon cream cheese filling, and tangy lemon curd come together in individual chilled dessert jars.
- Prep
- Cook
- Rest
- Total
- Servings
- 4 jars
Ingredients
Crust
- 1 cup graham cracker crumbs
- 3 tbsp unsalted butter, melted
- 1 tbsp granulated sugar
Cheesecake Filling
- 8 oz cream cheese, softened to room temperature
- 1/2 cup powdered sugar
- 1 tbsp lemon zest, freshly grated
- 2 tbsp lemon juice, freshly squeezed
- 1 tsp vanilla extract
- 1/2 cup heavy cream, chilled
Topping and Garnish
- 1/2 cup lemon curd, store-bought or made ahead
- 4 thin lemon slices, for garnish
- 4 sprigs fresh mint, for garnish
Instructions
Mix the Graham Crumble. Place the graham cracker crumbs into a medium bowl, add the melted unsalted butter and granulated sugar, and stir with a fork or spatula until the mixture resembles wet sand and holds together loosely when pinched.
Press the Crust into Jars. Distribute the remaining moistened crumbs evenly among the four glass jars, then gently press the crumble into the bottom of each jar using the flat end of a small spice jar or clean spoon to create a solid base.
Whip the Heavy Cream. Pour the cold heavy cream into a chilled bowl and beat on medium-high speed using a whisk or electric mixer until stiff peaks form, making sure not to overbeat past the point of glossy stability.
Beat the Cream Cheese Base. In a separate mixing bowl, beat the softened cream cheese with the powdered sugar, freshly grated lemon zest, fresh lemon juice, and vanilla extract on medium speed until entirely smooth, creamy, and free of lumps.
Fold the Whipped Cream into the Cheese. Gently fold the whipped cream into the lemon cream cheese mixture using broad, sweeping strokes with a silicone spatula, rotating the bowl until fully combined into a light, mousse-like consistency without deflating the aerated cream.
Pipe the Filling into Jars. Transfer the lemon cheesecake filling into a piping bag or large zip-top bag with the corner snipped off, and pipe the mixture smoothly into the jars over the pressed crusts, filling each about three-quarters full.
Layer Lemon Curd and Crumbs. Spoon two tablespoons of lemon curd over the cheesecake layer in each jar, gently tilting to spread it evenly across the surface, then sprinkle the reserved graham cracker crumbs over the curd layer.
Chill and Garnish. Cover the jars and refrigerate for at least two hours until the filling is chilled and firm, then garnish each jar with a fresh lemon slice and a sprig of fresh mint just before serving.
Allergens: Gluten, Eggs, Milk
Nutrition (estimated, per serving)
- Calories
- 480 kcal
- Protein
- 6 g
- Carbs
- 46 g
- Fat
- 31 g
- Fiber
- 1 g
- Sugar
- 34 g
- Sodium
- 310 mg
Estimates only: values vary with brands, substitutions and portion sizes.
Recipe by WixForum Kitchen · wixforum.com
Share this recipe
Send it to someone who’d love it, or save it for later.
Spotted a mistake in this recipe? Let us know.
Keep cooking


