Golden Stuffed Pide with Spiced Ground Beef
A crisp, golden yeast bread stuffed with juicy spiced ground beef, onion, and pepper. Baked until puffed and blistered, this tear-apart pide is pure comfort.
Published 10 min read
- Total time
- Prep
- Cook
- Rest
- Serves
- 6
- Makes 6 pide
- Cuisine
- Turkish
- Calories
- 480
- per serving, estimated

On this page16 sections
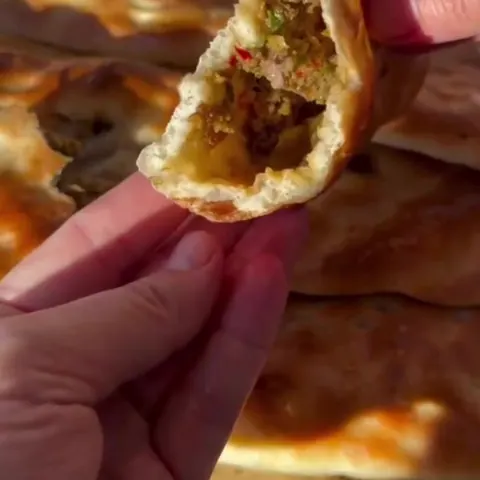
Imagine tearing into a golden, blistered bread that shatters with a crisp crust, releasing a cloud of fragrant steam from a juicy, spiced ground beef filling. This stuffed pide is a Turkish-inspired delight that combines a soft, chewy yeast dough with a savory, aromatic meat mixture. The contrast of textures—crisp exterior, tender crumb, and moist filling—makes every bite unforgettable. Perfect for a family dinner, a gathering, or a cozy weekend meal, this recipe is straightforward and rewarding.
Stuffed pide, a beloved Turkish flatbread, is a wonderful way to enjoy a hearty, hand-held meal. This version features a soft, enriched yeast dough filled with a savory mixture of ground beef, grated onion, red pepper, and cumin. The dough is stretched over the filling, pinched to seal, and baked until golden and puffed. The result is a bread that is crisp on the outside, tender inside, and bursting with juicy, flavorful meat. This recipe is designed for home cooks, with clear steps and tips to ensure success. The dough requires a rise, but the hands-on time is minimal, and the baking is quick. Serve these pide warm, torn open to reveal the steaming filling, and enjoy the wonderful aroma and taste.
The appeal
Why you’ll love it
The method of sealing the filling inside the dough and baking at a high temperature creates a steamy environment that cooks the meat gently while the exterior turns crisp and blistered. The high heat, 430°F, ensures the dough puffs quickly, giving a light, airy texture, while the sealed pocket traps the juices, keeping the filling moist and flavorful. This technique is similar to that used for other stuffed breads, and it works perfectly here.
The filling benefits from the grated onion, which adds moisture and sweetness, and the red pepper, which contributes a subtle sweetness and color. Cumin provides a warm, earthy note that pairs beautifully with the beef. Mixing the filling by hand ensures even distribution of seasonings without overworking the meat, which would make it tough. The result is a filling that is juicy, aromatic, and perfectly seasoned.
What you need
Ingredients
Makes 6 pide.
Dough
Filling
Egg wash
Contains:
- Gluten
- Milk
- Eggs
Tools
Equipment
- Large mixing bowl
- Plastic wrap or clean kitchen towel
- Baking sheet
- Parchment paper
- Pastry brush
- Box grater
Swaps
Substitutions
Instead ofGround beef
UseGround lamb or a mix of beef and lamb for a richer flavor.
Instead ofRed bell pepper
UseGreen bell pepper or a mild chili like poblano for a different kick.
Instead ofAll-purpose flour
UseBread flour for a chewier crust, or a gluten-free all-purpose blend (adjust liquid as needed).
Good to know
Notes
For the dough, use all-purpose flour for a tender crumb, or bread flour for a chewier texture. Active dry yeast needs to be dissolved in warm water (110°F–115°F) with a bit of sugar to activate; if using instant yeast, it can be mixed directly with the flour. The dough should be soft and slightly sticky but manageable; add a little extra flour if needed. Kneading develops the gluten, giving the bread structure and chew.
The filling can be customized: ground lamb or a mix of beef and lamb adds richness, and you can adjust the heat with a pinch of chili flakes. If you prefer a milder flavor, reduce the cumin. The egg wash, made with egg yolk and oil, gives the pide a beautiful golden sheen and helps the crust crisp. You can also sprinkle with sesame seeds or nigella seeds before baking, though the video does not show this.
Prep
Before you start
Before starting, gather all ingredients and equipment. Make sure the yeast is fresh and the water is warm but not hot (110°F–115°F). Grate the onion and chop the red pepper finely. Have a baking sheet lined with parchment paper ready. Clear a countertop for kneading and shaping. The dough needs about 1 hour to rise, so plan accordingly. The filling can be prepared while the dough rises, saving time. Preheat the oven only when you are ready to bake, as the pide need to rest after shaping.
Step by step
Method
Phase 1
Dough and Filling
Step 1: Make the dough
In a large bowl, combine the flour, yeast, sugar, and salt. Add the warm water and olive oil, then stir until a shaggy dough forms. Turn the dough out onto a lightly floured surface and knead for 8–10 minutes, until smooth and elastic. Place the dough in a greased bowl, cover with plastic wrap, and let rise in a warm spot for about 1 hour, until doubled in size.
You’ll need: all-purpose flour · active dry yeast · granulated sugar · kosher salt · warm water (110°F/43°C) · olive oil
Look for: The dough should be smooth, elastic, and doubled in volume after rising.
Tip: If the dough is too sticky, add a little more flour, a tablespoon at a time.
Step 2: Prepare the filling
In a medium bowl, combine the ground beef, grated onion, chopped red pepper, cumin, salt, and black pepper. Mix with your hands or a spoon until well combined. The mixture should be cohesive but not overworked.
You’ll need: ground beef · onion, grated · red bell pepper, finely chopped · ground cumin · salt · black pepper
Look for: The filling should be evenly mixed with no large clumps of meat.
Tip: Grating the onion releases its juices, which keeps the filling moist during baking.
Checkpoint
After this phase, you should have a smooth, elastic dough that has doubled in size, and a well-mixed filling that is aromatic with cumin and onion. The dough should spring back when poked, and the filling should be cohesive but not pasty. If the dough hasn't risen enough, give it more time; if the filling seems too wet, drain any excess liquid from the onion.
Phase 2
Shaping and Resting
Step 3: Divide and fill the dough
Punch down the risen dough and divide it into 6 equal pieces. On a lightly floured surface, roll each piece into a round about 5 inches across. Place a generous scoop of the filling in the center of each round. Pull the dough edges up over the filling and pinch tightly to seal, forming a ball.
You’ll need: all-purpose flour · ground beef
Look for: Each ball should be tightly sealed with no filling visible.
Tip: Keep the dough pieces covered with a towel while working to prevent drying.
Step 4: Shape the pide
Gently flatten each filled ball into an oval or boat shape, about 1 inch thick. Place the shaped pide on a parchment-lined baking sheet, leaving space between them. Cover loosely with a towel and let rest for 15 minutes while the oven heats.
You’ll need: all-purpose flour
Look for: The pide should hold their shape and feel slightly puffy after resting.
Tip: Shaping them into ovals gives the classic pide look and helps them bake evenly.
Checkpoint
The shaped pide should be evenly sized, tightly sealed, and slightly puffy after resting. They should hold their oval shape without spreading too much. If they spread, the dough may be too slack; gently reshape them. The surfaces should be smooth, with no cracks, and the filling should not be visible.
Phase 3
Baking and Serving
Step 5: Brush with egg wash and bake
Preheat the oven to 430°F (220°C). In a small bowl, whisk the egg yolk with the olive oil. Brush the tops and sides of the pide generously with the egg wash. Bake for 12 minutes, until deeply puffed and blistered on top, and the internal temperature of the filling reaches 160°F (71°C).
You’ll need: egg yolk · olive oil
Internal temperature 160°F (71°C)
Look for: The pide should be golden brown, puffed, and blistered; the filling should be bubbling hot.
Tip: If the tops brown too quickly, tent loosely with foil for the last few minutes.
Step 6: Cool and serve
Remove the baking sheet from the oven and let the pide cool for 5 minutes on the sheet. Then transfer to a cutting board. Tear or cut open the pide to release the steam and serve hot.
You’ll need: all-purpose flour
Look for: The pide should be crisp on the outside and the filling juicy and steaming.
Tip: Serve immediately for the best contrast of crisp crust and tender filling.
Checkpoint
The pide should emerge from the oven deeply golden, puffed, and blistered, with a shiny, glossy crust from the egg wash. The filling should be bubbling hot and reach 160°F (71°C). When torn, the steam should release and the filling should be juicy and flavorful. Serve immediately for the best texture.
Doneness
How to tell it’s done
The pide are done when they are deeply golden brown, puffed, and blistered on top, and the filling has reached an internal temperature of 160°F (71°C) as measured with an instant-read thermometer inserted through the side. The crust should feel crisp and sound hollow when tapped. If you tear one open, the filling should be steaming and juicy, with no pink remaining. Let them cool for a few minutes before serving to avoid burning your mouth, but they are best enjoyed warm.
Avoid these
Common mistakes
A common mistake is overfilling the pide, which makes them difficult to seal and can cause the filling to leak. Use about 1/4 cup of filling per pide. Another issue is under-proofing the dough, which results in a dense, heavy bread. Ensure the dough has doubled in size before shaping. Also, do not skip the egg wash—it is essential for the golden, blistered crust. Finally, do not overbake, as the bread can become dry; stick to the 12-minute mark and check for doneness.
Cook safely
Food safety
Safe internal temperatures
Cook to at least these temperatures, measured with an instant-read thermometer in the thickest part.
| Food | Minimum internal temperature |
|---|---|
| Ground meat | 160°F (71°C) |
| Egg dishes | 160°F (71°C) |
Better results
Tips
Tip 1
To achieve a beautifully blistered crust, make sure the oven is fully preheated and the baking sheet is placed on the middle rack. The high heat creates steam inside the dough, which puffs it up and creates those characteristic spots. If your oven runs hot, check the pide a minute or two early to prevent over-browning. For an extra crisp bottom, bake the pide directly on a preheated baking stone or steel, though a regular sheet works well.
Tip 2
When shaping the pide, keep your hands lightly floured to prevent sticking. If the dough resists stretching, let it rest for a few minutes before continuing. The filling should be at room temperature, not cold from the fridge, so it cooks evenly. If you have leftover filling, you can cook it separately and serve it with rice or salad. The pide are best fresh, but they can be reheated in a toaster oven or under a broiler to crisp up the crust.
Make it yours
Variations
Lamb and Mint
Substitute ground lamb for the beef and add 2 tablespoons chopped fresh mint to the filling. The mint brightens the richness of the lamb and pairs well with cumin. Proceed with the recipe as written.
Spicy Harissa
Add 1–2 tablespoons harissa paste to the filling for a spicy, smoky kick. Reduce the cumin to 1 teaspoon and add a pinch of cayenne. This version is bold and warming.
Cheese and Herb
Omit the red pepper and add 1/2 cup crumbled feta and 2 tablespoons chopped parsley to the filling. Reduce the salt to 1/2 teaspoon, as feta is salty. The cheese melts into the meat, creating a creamy texture.
Vegetarian Version
Replace the ground beef with 1 cup cooked lentils or chickpeas, mashed slightly. Add 1 tablespoon tomato paste and an extra 1/2 teaspoon cumin. The filling will be hearty and satisfying without meat.
On the table
Serving suggestions
Serve the pide hot, torn open to reveal the steaming filling. They are wonderful on their own, or accompanied by a simple salad of greens with lemon and olive oil. A bowl of thick yogurt or a tangy tomato-cucumber salad would also complement the rich, spiced meat. For a casual meal, set out the pide on a platter and let everyone pull off their own piece.
These stuffed pide are also great for entertaining—they can be made smaller as appetizers. If serving as a main, one pide per person is usually enough, but heartier appetites might want two. Pair with a light, crisp white wine or a cold beer. The contrast of the crisp crust and juicy filling is best enjoyed immediately, so plan to serve them straight from the oven.
Leftovers
Storage & make-ahead
- Fridge
- Store in an airtight container in the refrigerator for up to 3 days. Reheat in a 350°F oven for 8–10 minutes to restore crispness.
- Freezer
- Freeze baked pide in a single layer, then transfer to a freezer bag for up to 2 months. Reheat from frozen in a 350°F oven for 15–18 minutes.
- Reheat
- Reheat in a 350°F oven or toaster oven for 5–8 minutes until hot and crisp. Avoid microwaving.
Store leftover pide in an airtight container at room temperature for up to 2 days. To reheat, place them in a 350°F (175°C) oven for 5–8 minutes, or until warmed through and the crust is crisp again. Avoid microwaving, as it will make the bread soggy. If storing longer, freeze them.
Make ahead
The dough can be prepared up to 24 hours in advance: after kneading, place it in a greased bowl, cover, and refrigerate. The cold fermentation will develop more flavor. Let the dough come to room temperature and rise before shaping. The filling can also be made a day ahead and kept refrigerated. Assemble and bake the pide just before serving for the best texture.
Questions
Frequently asked questions
Can the dough be made without a stand mixer?
Yes, the dough can be kneaded by hand. It will take about 10 minutes of kneading on a lightly floured surface until smooth and elastic. The process is the same as using a mixer, just a bit more effort. Ensure the water is warm, not hot, to activate the yeast.
Why did the pide leak filling during baking?
Leaks usually happen if the dough is not sealed tightly or if the filling is too moist. Make sure to pinch the edges firmly, and avoid overfilling. If the filling is very wet, drain any excess liquid from the onion before mixing. Also, do not let the pide rest too long after shaping, as the dough can soften and split.
Can this recipe be doubled?
Yes, the recipe can easily be doubled. Use a larger bowl and allow more time for the dough to rise if needed. The baking time may need a few extra minutes if you bake more than one sheet at a time; rotate the sheets halfway through for even browning.
What is the best way to reheat leftover pide?
The best way to reheat is in a 350°F (175°C) oven or toaster oven for 5–8 minutes, until the crust is crisp and the filling is hot. Avoid microwaving, as it makes the bread soggy. If reheating from frozen, add a few extra minutes.
Can the filling be prepared in advance?
Yes, the filling can be made up to a day ahead and stored in the refrigerator. Bring it to room temperature before assembling the pide, as a cold filling will increase the baking time and may leave the center undercooked. The dough can also be refrigerated after kneading, then brought to room temperature and shaped.
Everything in one place: the recipe card below gathers the ingredients, steps and estimated nutrition, ready to print.
Recipe card
Golden Stuffed Pide with Spiced Ground Beef
A crisp, golden yeast bread stuffed with juicy spiced ground beef, onion, and pepper. Baked until puffed and blistered, this tear-apart pide is pure comfort.
- Prep
- Cook
- Rest
- Total
- Servings
- 6 pide
Ingredients
Dough
- 3 1/2 cups all-purpose flour
- 2 1/4 tsp active dry yeast
- 1 tbsp granulated sugar
- 1 1/2 tsp kosher salt
- 1 1/4 cups warm water (110°F/43°C)
- 2 tbsp olive oil
Filling
- 1 lb ground beef
- 1 medium onion, grated
- 1 red bell pepper, finely chopped
- 1 tbsp ground cumin
- 1 tsp salt
- 1/2 tsp black pepper
Egg wash
- 1 egg yolk
- 1 tbsp olive oil
Instructions
Make the dough. In a large bowl, combine the flour, yeast, sugar, and salt. Add the warm water and olive oil, then stir until a shaggy dough forms. Turn the dough out onto a lightly floured surface and knead for 8–10 minutes, until smooth and elastic. Place the dough in a greased bowl, cover with plastic wrap, and let rise in a warm spot for about 1 hour, until doubled in size.
Prepare the filling. In a medium bowl, combine the ground beef, grated onion, chopped red pepper, cumin, salt, and black pepper. Mix with your hands or a spoon until well combined. The mixture should be cohesive but not overworked.
Divide and fill the dough. Punch down the risen dough and divide it into 6 equal pieces. On a lightly floured surface, roll each piece into a round about 5 inches across. Place a generous scoop of the filling in the center of each round. Pull the dough edges up over the filling and pinch tightly to seal, forming a ball.
Shape the pide. Gently flatten each filled ball into an oval or boat shape, about 1 inch thick. Place the shaped pide on a parchment-lined baking sheet, leaving space between them. Cover loosely with a towel and let rest for 15 minutes while the oven heats.
Brush with egg wash and bake. Preheat the oven to 430°F (220°C). In a small bowl, whisk the egg yolk with the olive oil. Brush the tops and sides of the pide generously with the egg wash. Bake for 12 minutes, until deeply puffed and blistered on top, and the internal temperature of the filling reaches 160°F (71°C).
Cool and serve. Remove the baking sheet from the oven and let the pide cool for 5 minutes on the sheet. Then transfer to a cutting board. Tear or cut open the pide to release the steam and serve hot.
Allergens: Gluten, Milk, Eggs
Nutrition (estimated, per serving)
- Calories
- 480 kcal
- Protein
- 24 g
- Carbs
- 52 g
- Fat
- 20 g
Estimates only: values vary with brands, substitutions and portion sizes.
Recipe by WixForum Kitchen · wixforum.com
Share this recipe
Send it to someone who’d love it, or save it for later.
Spotted a mistake in this recipe? Let us know.
Keep cooking


