Pull-Apart Cheeseburger Bun Bomb
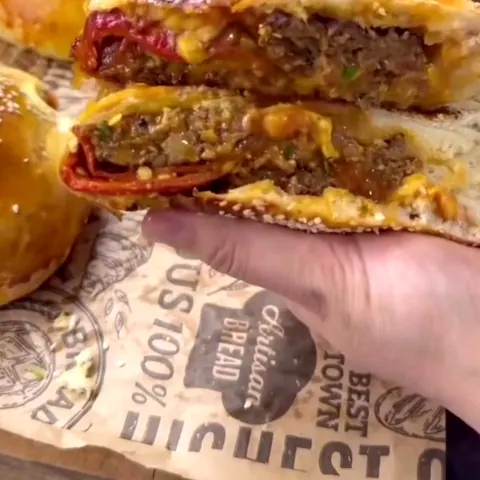
A golden brioche bun wrapped around a juicy beef patty, melted cheddar, grilled tomato, and caramelized onions—baked until puffed and perfect for tearing apart.
Published 10 min read
- Total time
- Prep
- Cook
- Rest
- Serves
- 4
- Cuisine
- American
- Calories
- 620
- per serving, estimated

On this page16 sections
Imagine a warm, golden brioche bun that hides a juicy beef patty, melted cheddar, grilled tomato, and sweet caramelized onions. This pull-apart cheeseburger bun bomb is a fun, shareable dinner that turns a classic burger into a spectacular baked centerpiece. The dough bakes up soft and pillowy, while the filling stays hot and savory. Perfect for game day, family dinners, or any time you want a meal that feels special but comes together with simple ingredients. Tear it open and watch the cheese stretch.
This recipe takes all the flavors of a classic cheeseburger and wraps them in a soft yeast dough, creating a pull-apart bun bomb that’s as fun to make as it is to eat. The dough is draped into a small cup, layered with cheddar, a seared beef patty, grilled tomato, and caramelized onions, then sealed and baked until golden. The result is a self-contained burger experience with a crisp, shiny crust and a molten, savory center. Serve it whole and let everyone tear off a piece, or slice it into wedges for a neat presentation.
The appeal
Why you’ll love it
The method of baking the filling inside the dough ensures that every bite has a perfect ratio of bread to filling. The dough acts as both the bun and the vessel, so no assembly is required at the table. Because the filling is fully enclosed, the juices from the beef and onions stay locked in, keeping the interior moist and flavorful. The egg wash and sesame seeds create a glossy, appetizing crust that contrasts beautifully with the soft interior.
Using a cup to shape the dough guarantees a uniform, deep pocket that holds the filling securely. The dough is draped over the cup, filled, and then sealed, which creates a sturdy shell that doesn’t leak or burst during baking. The beef is seared first to develop flavor and ensure it reaches a safe temperature, while the cheese melts into the crevices. This technique is forgiving and works with store-bought or homemade dough, making it accessible to any home cook.
What you need
Ingredients
Makes 4 servings.
Contains:
- Gluten
- Eggs
- Milk
- Sesame
Tools
Equipment
- Small round ceramic cup (about 4 inches wide)
- Baking sheet lined with parchment paper
- Pastry brush
- Skillet for grilling tomato and browning beef
- Instant-read thermometer
Swaps
Substitutions
Instead ofSoft yeast dough
UseUse thawed bread dough or pizza dough for a quicker option; adjust baking time as needed.
Instead ofYellow cheddar
UseSwap with provolone, mozzarella, or Swiss for a different melt and flavor.
Instead ofGround beef
UseGround turkey or chicken can be used; ensure the internal temperature reaches 165°F (74°C).
Instead ofCaramelized onions
UseQuickly sauté sliced onions in butter for 10 minutes until soft and golden, or use frozen caramelized onions.
Good to know
Notes
Use a high-quality store-bought pizza dough or a soft brioche dough for the best texture. If using homemade dough, make sure it’s well-risen and pliable. The cheddar should be sliced thinly so it melts evenly, but any good melting cheese like provolone or mozzarella will work. For the beef, 80% lean ground beef provides enough fat to keep the patty juicy without being greasy.
Caramelized onions can be made ahead and stored in the refrigerator for up to a week. If you’re short on time, use frozen caramelized onions or quickly sauté sliced onions in butter until soft and golden. The tomato should be ripe but firm so it holds up during grilling and baking. Adjust the salt and pepper to taste, but remember that the cheese and dough also add flavor.
Prep
Before you start
Before you start, make sure your yeast dough is at room temperature; if it’s cold, let it sit out for 30 minutes. Preheat the oven to 375°F (190°C) and line a baking sheet with parchment paper. Have your ceramic cup ready—a 4-inch round ramekin or small bowl works well. Caramelize the onions if you haven’t already, and slice the cheese and tomato. Season the ground beef and form the patty, then set everything within reach for easy assembly.
Step by step
Method
Phase 1
Assemble the Filling
Step 1: Prep the Filling
Season the ground beef with salt and pepper, then form into a thick patty about the size of your cup. Heat a skillet over medium-high heat and cook the patty for 3 to 4 minutes per side until well browned but not cooked through. Remove from the skillet and set aside. In the same skillet, grill the tomato slices for 1 minute per side until lightly charred. Have the cheddar slices and caramelized onions ready.
You’ll need: ground beef (80% lean) · kosher salt · black pepper · large tomato, sliced into 4 rounds
Internal temperature 160°F (71°C)
Look for: The patty is browned on both sides, and the tomato has grill marks.
Tip: Use a patty that fits your cup with about 1/2 inch of space around the edges.
Step 2: Drape the Dough
Roll the soft yeast dough into a round about 8 inches in diameter. Drape the dough over the small ceramic cup, pressing it gently into the bottom and up the sides, leaving the edges hanging over the rim. Press the cheddar slices into the bottom of the dough-lined cup.
You’ll need: soft yeast dough (store-bought or homemade) · yellow cheddar cheese, sliced
Look for: The dough covers the inside of the cup completely, with about 1 inch of overhang.
Tip: If the dough is too elastic, let it rest for 5 minutes before rolling again.
Step 3: Layer the Fillings
Place the grilled tomato slice on top of the cheddar. Set the cooked beef patty over the tomato. Spoon the caramelized onions over the patty, pressing gently to compact. Gather the overhanging dough edges and pinch them together at the top to seal the bomb completely. Invert the cup onto a parchment-lined baking sheet, so the seam side is down.
You’ll need: large tomato, sliced into 4 rounds · ground beef (80% lean) · caramelized onions
Look for: The dough is sealed securely, and the bomb sits seam-side down on the baking sheet.
Tip: Pinch the dough firmly to avoid leaks during baking.
Checkpoint
The beef patty is browned on both sides and the tomato is lightly charred. The dough is draped over the cup, and the cheddar is pressed into the bottom. All the components are ready to be layered, and the kitchen smells of seared beef and grilled tomato.
Phase 2
Seal and Bake
Step 4: Brush and Sprinkle
Beat the egg yolk with 1 tablespoon of water in a small bowl. Brush the entire surface of the dough bomb with the egg wash, then sprinkle the white sesame seeds evenly over the top.
You’ll need: egg yolk · white sesame seeds
Look for: The bomb is glossy with egg wash and covered with sesame seeds.
Tip: Use a light hand with the egg wash to avoid pooling at the base.
Step 5: Bake the Bomb
Preheat the oven to 375°F (190°C). Bake the bun bomb for 20 to 25 minutes, until the dough is puffed and deep golden brown. If the top browns too quickly, tent loosely with foil. The internal temperature of the beef should reach 160°F (71°C).
You’ll need: soft yeast dough (store-bought or homemade)
Internal temperature 160°F (71°C)
Look for: The crust is golden brown, and the bomb sounds hollow when tapped.
Tip: Let the bomb rest for 5 minutes before serving to set the cheese.
Checkpoint
The dough is sealed securely, brushed with egg wash, and sprinkled with sesame seeds. The bomb is baking in the oven, and soon the kitchen fills with the aroma of fresh bread and melting cheese. The crust is turning golden, and the dough is puffing up beautifully.
Phase 3
Rest and Reveal
Step 6: Rest and Serve
Remove the bun bomb from the oven and let it rest on the baking sheet for 5 minutes. Transfer to a cutting board or serving plate. Tear open the top with your hands to reveal the juicy filling, and serve hot.
Look for: The cheese is melted and oozing, and the beef is juicy.
Tip: Serve immediately for the best pull-apart effect.
Checkpoint
The bomb has rested for 5 minutes, and the crust is crisp. When torn open, the cheese stretches, the beef is juicy, and the onions are sweet. The dish is ready to serve, and the presentation is impressive.
Doneness
How to tell it’s done
The bun bomb is done when the crust is deep golden brown and puffed, and the internal temperature of the beef reaches 160°F (71°C). Insert an instant-read thermometer through the dough into the center to check. The dough should sound hollow when tapped on the bottom, and the cheese should be visibly melted and oozing when you tear it open. Let it rest for 5 minutes before serving to allow the juices to settle.
Avoid these
Common mistakes
One common mistake is overfilling the dough, which can cause leaks. Use a patty that fits comfortably with room to seal. Another issue is underbaking, which leaves the dough doughy and the beef undercooked—always check the temperature. If the top browns too quickly, tent with foil to prevent burning. Finally, don’t skip the egg wash; it’s essential for the shiny, golden crust and helps the sesame seeds stick.
Cook safely
Food safety
Safe internal temperatures
Cook to at least these temperatures, measured with an instant-read thermometer in the thickest part.
| Food | Minimum internal temperature |
|---|---|
| Ground meat | 160°F (71°C) |
| Egg dishes | 160°F (71°C) |
Better results
Tips
Tip 1
For the best pull-apart effect, serve the bun bomb whole and let everyone tear off a piece with their hands. If you prefer a neater presentation, use a serrated knife to slice it into wedges, but be aware that the filling may shift. To ensure the dough cooks through, make sure the patty is not too thick—about 1/2 inch is ideal. If you’re using a larger cup, adjust the baking time accordingly.
Tip 2
To make this recipe ahead, assemble the bomb completely, then refrigerate it for up to 24 hours. When ready to bake, add 5 to 10 minutes to the baking time. The egg wash can be applied just before baking, or you can brush it on after the bomb has chilled. If you’re using store-bought dough, let it come to room temperature before shaping to prevent tearing.
Make it yours
Variations
Bacon Cheeseburger Bomb
Add 4 slices of cooked bacon, chopped, to the filling along with the beef. The smoky flavor pairs perfectly with the cheddar and caramelized onions. Cook the bacon until crisp, then crumble it over the patty before sealing the dough.
Spicy Jalapeño Bomb
Add sliced pickled jalapeños to the filling for a kick of heat. Use pepper jack cheese instead of cheddar for extra spice. The jalapeños add acidity that balances the richness of the beef and cheese.
Mushroom Swiss Bomb
Sauté 1 cup of sliced mushrooms with butter until golden, and use Swiss cheese instead of cheddar. The earthy mushrooms and nutty Swiss cheese create a sophisticated flavor profile. Layer the mushrooms on top of the beef before adding the onions.
BBQ Pulled Pork Bomb
Substitute the beef patty with 1 cup of shredded cooked pork mixed with your favorite BBQ sauce. Reduce the salt in the recipe since BBQ sauce is often salty. Use smoked gouda or cheddar for a smoky twist.
On the table
Serving suggestions
Serve the bun bomb as the centerpiece of a casual dinner, with a simple green salad or roasted vegetables on the side. It’s also great for game day or parties, where guests can pull off pieces with their hands. For a more substantial meal, offer extra caramelized onions and pickles on the side.
Pair it with a cold beer or a sparkling lemonade to cut through the richness. The bun bomb is best enjoyed warm, when the cheese is still oozing and the crust is crisp. If you have leftovers, they make a fantastic next-day lunch—just reheat and enjoy.
Leftovers
Storage & make-ahead
- Fridge
- Refrigerate leftover bun bomb in an airtight container for up to 3 days.
- Freezer
- Freeze the baked bun bomb for up to 2 months. Wrap tightly in foil and plastic wrap.
- Reheat
- Reheat from frozen in a 350°F (175°C) oven for 20-25 minutes, or until hot and crispy.
Store any leftover bun bomb in an airtight container in the refrigerator for up to 3 days. To reheat, place it in a 350°F (175°C) oven for 10 minutes, or until warmed through. The crust will crisp up again, and the cheese will melt.
Make ahead
You can assemble the bun bomb a day in advance and keep it covered in the refrigerator. Let it sit at room temperature for 30 minutes before baking to ensure even cooking. Alternatively, bake it fully, let it cool completely, and refrigerate; reheat in a 350°F (175°C) oven for 15 minutes.
Questions
Frequently asked questions
Can this recipe be made with gluten-free dough?
Yes, you can use a gluten-free pizza dough blend. Make sure it is pliable enough to drape over the cup. Gluten-free dough may require a slightly longer baking time to ensure it cooks through. Check the internal temperature of the beef and the crust color to determine doneness.
Why does the dough sometimes tear when sealing?
If the dough is too cold or too dry, it can tear. Let the dough come to room temperature and, if needed, moisten the edges with a little water to help them stick. Also, avoid overfilling, which puts tension on the seam. Pinch the dough firmly and press the edges together to create a tight seal.
Can this be baked in a muffin tin instead of a cup?
Yes, you can use a jumbo muffin tin for individual bun bombs. Divide the dough and filling among the cups, and reduce the baking time to 15 to 18 minutes. This is a great option for parties or meal prep, as each serving is already portioned.
How can you tell when the beef is fully cooked inside the dough?
Use an instant-read thermometer inserted through the dough into the center of the patty. It should read at least 160°F (71°C). If you don't have a thermometer, cut into the center and check that the beef is no longer pink and the juices run clear.
What is the best way to reheat leftovers without drying them out?
Reheat in a 350°F (175°C) oven for 10 to 15 minutes, covered with foil to prevent over-browning. This helps the cheese melt and the dough soften. Avoid microwaving, as it can make the crust soggy and the beef tough.
Everything in one place: the recipe card below gathers the ingredients, steps and estimated nutrition, ready to print.
Recipe card
Pull-Apart Cheeseburger Bun Bomb
A golden brioche bun wrapped around a juicy beef patty, melted cheddar, grilled tomato, and caramelized onions—baked until puffed and perfect for tearing apart.
- Prep
- Cook
- Rest
- Total
- Servings
- 4 servings
Ingredients
- 1 lb soft yeast dough (store-bought or homemade)
- 4 oz yellow cheddar cheese, sliced
- 1 large tomato, sliced into 4 rounds
- 1 lb ground beef (80% lean)
- 1/2 tsp kosher salt
- 1/4 tsp black pepper
- 1 cup caramelized onions
- 1 egg yolk
- 1 tbsp white sesame seeds
Instructions
Prep the Filling. Season the ground beef with salt and pepper, then form into a thick patty about the size of your cup. Heat a skillet over medium-high heat and cook the patty for 3 to 4 minutes per side until well browned but not cooked through. Remove from the skillet and set aside. In the same skillet, grill the tomato slices for 1 minute per side until lightly charred. Have the cheddar slices and caramelized onions ready.
Drape the Dough. Roll the soft yeast dough into a round about 8 inches in diameter. Drape the dough over the small ceramic cup, pressing it gently into the bottom and up the sides, leaving the edges hanging over the rim. Press the cheddar slices into the bottom of the dough-lined cup.
Layer the Fillings. Place the grilled tomato slice on top of the cheddar. Set the cooked beef patty over the tomato. Spoon the caramelized onions over the patty, pressing gently to compact. Gather the overhanging dough edges and pinch them together at the top to seal the bomb completely. Invert the cup onto a parchment-lined baking sheet, so the seam side is down.
Brush and Sprinkle. Beat the egg yolk with 1 tablespoon of water in a small bowl. Brush the entire surface of the dough bomb with the egg wash, then sprinkle the white sesame seeds evenly over the top.
Bake the Bomb. Preheat the oven to 375°F (190°C). Bake the bun bomb for 20 to 25 minutes, until the dough is puffed and deep golden brown. If the top browns too quickly, tent loosely with foil. The internal temperature of the beef should reach 160°F (71°C).
Rest and Serve. Remove the bun bomb from the oven and let it rest on the baking sheet for 5 minutes. Transfer to a cutting board or serving plate. Tear open the top with your hands to reveal the juicy filling, and serve hot.
Allergens: Gluten, Eggs, Milk, Sesame
Nutrition (estimated, per serving)
- Calories
- 620 kcal
- Protein
- 32 g
- Carbs
- 45 g
- Fat
- 32 g
Estimates only: values vary with brands, substitutions and portion sizes.
Recipe by WixForum Kitchen · wixforum.com
Share this recipe
Send it to someone who’d love it, or save it for later.
Spotted a mistake in this recipe? Let us know.
Keep cooking


